Wall Mounted Copper Range Hoods

Wall Mounted Copper Range Hoods

Posted by Rustica House Editorial Team on 7th Jan 2021

Wall-Mounted Copper Range Hoods: Custom Ventilation and Artisan Kitchen Design

Wall-mounted copper range hoods combine practical kitchen ventilation with the warmth, texture, and architectural presence of handcrafted metalwork. Installed above a range positioned against a wall, this configuration fits naturally between cabinets, beneath a custom enclosure, or as a freestanding focal point on a plaster, stone, brick, or tiled cooking wall. Copper allows the hood to adapt to farmhouse, Spanish Colonial, Hacienda, rustic, transitional, industrial, and contemporary interiors through changes in silhouette, hammering, decorative details, and patina. Whether planned for a new kitchen or adapted to an existing renovation, a wall-mounted copper range hood provides a made-to-order solution designed around the range, cabinetry, ceiling, and selected ventilation insert.

Blog Summary

  • Product: Wall-mounted copper hood
  • Purpose: Decorative kitchen ventilation
  • Placement: Above a wall-side range
  • Options: Custom size and patina
  • Styles: Rustic through contemporary

Wall-Mounted Copper Range Hoods

What Is a Wall-Mounted Copper Range Hood?

A wall-mounted hood is installed above a stove or cooktop positioned against a wall. The front and sides are fully finished, while the rear remains open against the mounting surface to accommodate structural attachment, ductwork, electrical service, and the internal ventilation system.

This construction differs from an island hood, which must be finished on all four sides because it remains visible from every direction.

Why Wall-Mounted Hoods Are So Popular

Most residential kitchens place the cooking appliance against a wall and between cabinets. This makes a wall-mounted configuration the most direct and practical choice for many layouts.

It also allows the ductwork to travel upward through the wall or ceiling without requiring the more complex support and finished rear surface of an island hood.

Wall-Mount Advantages

  • Practical: Fits common kitchen layouts
  • Efficient: Positioned directly above range
  • Flexible: Works between cabinets
  • Architectural: Creates a focal wall
  • Custom: Sized for the project

Planning for a New Kitchen

A new kitchen provides the greatest flexibility because the cabinets, appliance, backsplash, duct route, electrical service, and hood can be designed together. The cooking wall may be built around the copper enclosure as the primary architectural feature.

Early planning also allows the homeowner to choose the ideal range location rather than being limited by an existing vent opening.

Building the Kitchen Around the Hood

A custom copper hood can establish the room’s material palette and design direction. Cabinet colors, backsplash patterns, hardware, lighting, flooring, and nearby metalwork may all be selected to support its shape and patina.

Explore more rustic copper range hood designs before finalizing the surrounding cabinetry.

Planning Cabinet Openings

The cabinet layout must provide enough width, height, and depth for the hood while preserving clearances required by the cooking appliance and ventilation insert. Adjacent upper cabinets should frame the enclosure without visually crowding it.

The cabinetmaker and hood manufacturer should work from the same final dimensions.

New-Kitchen Planning

  • Range: Select appliance first
  • Insert: Confirm exact model
  • Cabinets: Frame the hood opening
  • Duct: Plan the shortest route
  • Electrical: Coordinate power access

Adapting a Hood to an Existing Kitchen

Renovating an existing kitchen requires careful measurement of the available wall area, range width, cabinet opening, ceiling height, backsplash, duct location, and utility connections.

A made-to-order hood can often be adjusted to these conditions more successfully than a fixed factory model.

Replacing an Existing Range Hood

The new copper enclosure may need to use the current duct route or cover marks left by the previous hood. The contractor should inspect the wall, framing, electrical supply, and duct diameter before the replacement is ordered.

Do not assume that the existing insert or opening will fit the new copper hood without verification.

Working Between Existing Cabinets

Measure the cabinet opening at several heights because walls and cabinetry may not be perfectly parallel. Allow enough space for handmade dimensional variation and installation access.

A hood installed too tightly between cabinets may be difficult to position and service.

Renovation Measurements

  • Opening Width: Measure several points
  • Ceiling Height: Confirm finished dimension
  • Duct Location: Identify exact position
  • Wall Support: Inspect framing
  • Utilities: Verify power and venting

Custom Copper Hood Width

The hood width should be selected in relation to the range, outer burners, cooking style, surrounding cabinets, and ventilation insert. Many projects use a hood wider than the cooking appliance to improve side coverage and create stronger architectural proportions.

The final width should be reviewed by the installer or ventilation professional before production.

Matching the Range Width

A hood may match the range width when space is limited or when the kitchen design requires precise alignment. In this arrangement, accurate centering becomes especially important.

The ventilation specialist should confirm whether equal widths provide adequate capture for the selected appliance and cooking habits.

Choosing a Wider Hood

A hood extending several inches beyond each side of the range can provide broader capture and a more substantial appearance. This option is common in larger kitchens and above professional-style appliances.

The cabinet opening and backsplash should be planned around the final hood width rather than the range alone.

Width Considerations

  • Range: Confirm appliance width
  • Burners: Review outer cooking zones
  • Cabinets: Maintain visual balance
  • Insert: Allow internal clearance
  • Coverage: Consider wider enclosure

Custom Hood Height

Hood height is influenced by ceiling height, mounting clearance, cabinet arrangement, insert dimensions, ductwork, and the desired silhouette. A tall hood can emphasize vertical architecture, while a shorter enclosure may fit beneath beams, soffits, or upper cabinetry.

The crown, chimney, and body proportions should be adjusted together so the design remains balanced.

Hoods Reaching the Ceiling

A hood extending to the ceiling creates a complete architectural composition and hides the duct route. This approach works especially well in kitchens with high ceilings and broad cooking walls.

The upper crown should coordinate with cabinet molding and ceiling conditions.

Hoods Ending Below the Ceiling

Some wall-mounted hoods stop below the ceiling, leaving visible wall space above the crown. This can suit rustic, Mediterranean, and transitional interiors when the proportions are intentional.

The duct must still be concealed or incorporated into the design.

Height Planning

  • Ceiling: Confirm final room height
  • Clearance: Follow appliance requirements
  • Insert: Include mechanical height
  • Chimney: Conceal ductwork
  • Crown: Finish the upper profile

Custom Hood Depth

A depth of approximately 24 inches works for many residential kitchens. Deeper ranges, forward burners, and larger inserts may require 26 to 30 inches.

The hood should extend far enough over the cooking surface to provide appropriate capture while remaining comfortable for the cook.

Coordinating Depth with the Insert

The decorative enclosure must be deeper than the ventilation insert so the equipment fits inside with room for attachment, wiring, filters, and service access.

Always provide the exact insert depth rather than relying on a general product category.

Depth Considerations

  • Standard: Approximately 24 inches
  • Deep Range: May require 26–30 inches
  • Insert: Must fit inside hood
  • Capture: Cover front cooking area
  • Comfort: Preserve head clearance

Hand-Hammered Copper Texture

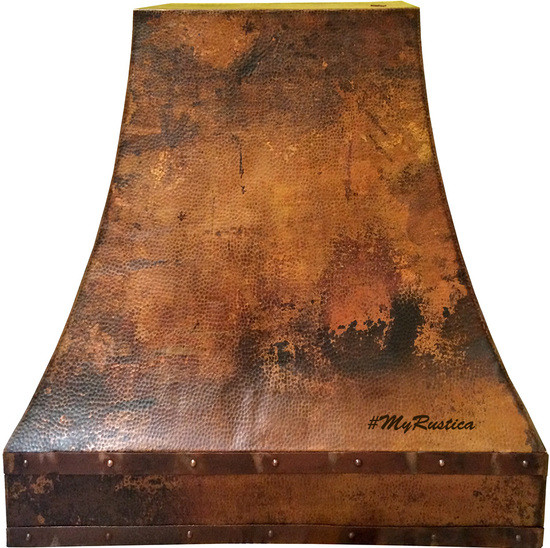
Hammered copper introduces visible marks formed manually across the enclosure. Each impression catches light differently and creates a surface with greater depth than smooth sheet metal.

The hammering also reinforces the traditional Mexican craftsmanship associated with handmade copper appliances.

Light and Shadow Across the Hood

Natural daylight may reveal brighter reddish and golden areas, while warm evening light produces deeper brown and bronze tones. Curved and tapered profiles strengthen this effect by changing the angle of reflection.

The hood therefore becomes visually dynamic without requiring additional ornament.

Smooth Copper Options

A smoother copper surface creates cleaner lines and a more restrained architectural effect. It works especially well in transitional, industrial, and contemporary kitchens.

Subtle forming marks may remain because the enclosure is still shaped by hand.

Surface Choices

  • Hammered: Traditional artisan texture
  • Smooth: Refined modern appearance
  • Light Hammering: Subtle movement
  • Deep Hammering: Strong rustic detail
  • Custom: Project-specific surface

Natural Copper Patina

Natural copper displays reddish, golden, and light brown tones. It suits farmhouse, transitional, contemporary, and rustic kitchens where the hood should remain warm and visually bright.

The surface will gradually develop additional tonal variation through exposure and use.

Antique Copper Finish

An antique patina introduces deeper brown areas around hammer marks, seams, corners, and decorative details. It creates an aged appearance suited to Spanish Colonial, traditional, Tuscan, and Mediterranean kitchens.

Against white or cream cabinetry, the darker finish creates strong contrast.

Coffee and Dark Patinas

Coffee patina produces a rich brown surface with warm copper undertones. Dark coffee offers a more dramatic appearance and works well with carved wood, stone, plaster, and iron.

These finishes often reinforce rustic and Hacienda-inspired architecture.

Polished Copper

A polished finish creates a brighter, more reflective hood. It can suit formal transitional and contemporary spaces where the metal is intended to appear lighter and more refined.

Preserving a bright polished appearance generally requires more careful maintenance than allowing natural patina development.

Oxidized Green Copper

Oxidized finishes introduce green, blue, and turquoise tones associated with weathered copper. The effect may be applied across the complete enclosure or concentrated around seams, edges, straps, and decorative details.

This option becomes a strong color statement in neutral kitchens.

Patina Options

  • Natural: Warm reddish copper
  • Antique: Traditional aged tones
  • Coffee: Rich brown finish
  • Polished: Bright reflective surface
  • Oxidized: Green-blue variation

Copper as a Living Finish

Copper reacts naturally to air, moisture, heat, fingerprints, oils, cooking residue, and cleaning products. The finish may darken, lighten, or develop additional color variation.

Exact color matching between photographs, samples, and separately produced copper pieces cannot be guaranteed.

Custom Hood Silhouettes

Wall-mounted copper hoods are available in several profiles, including bell-shaped, tapered, trapezoidal, curved, box-style, under-cabinet, and flared designs. The silhouette should coordinate with the room architecture and cabinet style.

A curved form feels more traditional, while straight sides create a cleaner transitional or modern appearance.

Bell-Shaped Hoods

A bell-shaped hood expands outward toward the lower apron and creates a soft sculptural profile. It provides a broad surface for hammering, patina, straps, and ornament.

This form works especially well in Spanish Colonial, Hacienda, Mediterranean, and traditional interiors.

Trapezoidal Hoods

A trapezoidal hood uses straight sloping sides to create a structured architectural silhouette. It preserves the warmth of copper while reducing decorative complexity.

This shape fits farmhouse, Mission, transitional, industrial, and rustic-modern kitchens.

Box and Under-Cabinet Designs

Box-style and under-cabinet hoods provide cleaner geometry for kitchens with limited vertical space or existing upper cabinetry. Their compact form can still include hammered copper, rivets, straps, or a decorative apron.

Interior space must remain sufficient for the selected insert.

Popular Hood Shapes

  • Bell: Curved traditional form
  • Tapered: Narrow upper silhouette
  • Trapezoid: Straight sloping sides
  • Box: Clean geometric profile
  • Under Cabinet: Compact installation

Decorative Copper Straps

Straps may be installed vertically or horizontally across the enclosure. Vertical bands emphasize height, while horizontal straps make the hood appear broader.

The straps may match the copper body or contrast through iron, brass, zinc, or another metal.

Decorative Rivets

Rivets can follow the straps, apron, crown, seams, or lower edge. Their repeated spacing reinforces the handcrafted appearance and creates small areas of shadow across the hood.

The rivet scale should remain proportionate to the enclosure dimensions.

Embossed Aprons

The lower apron can include grapes, flowers, scrolls, stars, geometric borders, or custom-inspired ornament. This area remains highly visible because it sits near eye level.

A decorative apron strengthens traditional character, while a plain lower band supports cleaner architecture.

Decorative Details

  • Straps: Vertical or horizontal bands
  • Rivets: Repeated metal accents
  • Apron: Decorative lower section
  • Crown: Finished upper molding
  • Embossing: Hand-worked motifs

Ventilation Insert Preparation

The copper enclosure is the decorative shell surrounding a separate mechanical ventilation system. The insert contains the blower, filters, lighting, controls, and electrical components.

The hood must be designed around the exact insert rather than a general estimate.

Providing Complete Insert Information

Before production, provide the manufacturer, model number, width, depth, height, duct opening, liner requirements, and technical installation manual. This information allows the copper interior to be prepared correctly.

Do not finalize cabinetry or duct openings using incomplete insert dimensions.

Economy Ventilation Option

A basic 200 CFM insert may be suitable for lighter residential cooking and smaller hoods where limited extraction is required. It typically includes basic fan operation, filtration, and lighting.

More demanding cooking applications generally require a stronger buyer-supplied system.

Buyer-Supplied Internal Inserts

The hood may be prepared for a compatible internal insert selected by the buyer. Systems rated up to approximately 1,200 CFM can be accommodated when their full specifications are provided and the dimensions fit the enclosure.

The buyer remains responsible for purchasing the mechanical equipment.

External Blowers

An external blower places the motor on the roof or exterior wall rather than inside the hood. This may reduce some motor noise near the cooking area.

The copper enclosure may be prepared for systems rated up to approximately 1,500 CFM when complete documentation is supplied before fabrication.

Ventilation Options

  • Economy Insert: Basic 200 CFM system
  • Internal Insert: Up to 1,200 CFM
  • External Blower: Up to 1,500 CFM
  • Buyer Supplied: Selected separately
  • Custom Interior: Built to specifications

Ducted Wall-Mounted Hoods

A ducted hood moves cooking smoke, steam, grease, heat, and odors outside through approved metal ductwork. This is generally the preferred configuration when the kitchen provides a practical exterior route.

The duct diameter, length, elbows, termination, and local requirements should be reviewed by a qualified installer.

Recirculating Wall-Mounted Hoods

A recirculating insert filters cooking air and returns it to the kitchen. This option may be useful in apartments, condominiums, and interior kitchens where exterior ducting is unavailable.

The insert must support recirculation, and the enclosure may require side openings for filtered air discharge.

Performance Depends on the Insert

The decorative copper shell does not determine airflow, noise, filter type, lighting, controls, or speed settings. These functions depend on the selected mechanical ventilation system.

Choose the insert according to burner output, cooking frequency, kitchen volume, ductwork, and local requirements.

Performance Factors

  • Blower: Determines airflow
  • Filters: Capture airborne grease
  • Duct: Affects resistance
  • Height: Influences capture
  • Cooking: Determines ventilation demand

Farmhouse Kitchen Applications

Copper is especially effective in farmhouse kitchens containing shaker cabinetry, apron-front sinks, reclaimed wood, stone counters, open shelving, and handmade tile. The hood adds warmth and handcrafted character without requiring an overly ornate silhouette.

Natural and coffee patinas work particularly well with warm white, cream, sage, and wood cabinetry.

Pairing with Farmhouse Materials

Wood beams, stone flooring, linen textiles, iron lighting, and simple ceramic tile provide an effective background for a copper focal point. The surrounding materials should support the hood without competing with its texture.

Learn more about farmhouse-style range hoods for rustic and transitional kitchens.

Farmhouse Pairings

  • Shaker Cabinets: Clean traditional structure
  • Apron Sink: Classic farmhouse feature
  • Wood Beams: Natural architectural warmth
  • Stone Counters: Durable neutral surface
  • Iron Lighting: Strong dark contrast

Spanish Colonial and Hacienda Kitchens

Wall-mounted copper hoods fit naturally within Spanish Colonial and Hacienda interiors. Copper, Talavera tile, plaster, carved wood, terracotta, stone, and wrought iron create a layered material palette associated with historic Mexican architecture.

Curved silhouettes, dark patinas, straps, rivets, and embossed aprons reinforce the regional character.

Pairing with Talavera Tile

Talavera tile introduces cobalt, green, yellow, terracotta, and white behind the warm metal. A decorative tile panel can frame the cooking zone, while solid-color tile creates a quieter background.

A highly ornate hood generally benefits from a more controlled backsplash pattern.

Spanish Colonial Pairings

  • Talavera Tile: Colorful artisan backdrop
  • Plaster: Soft architectural surface
  • Terracotta: Warm flooring material
  • Carved Wood: Traditional cabinetry
  • Iron Fixtures: Historic metal contrast

Traditional Kitchen Applications

A traditional kitchen can support layered molding, decorative straps, rivets, embossed aprons, carved cabinetry, and formal stone. The hood should remain proportional to the room’s millwork and ceiling height.

Antique and coffee finishes create a warm counterpoint to painted cabinets and polished countertops.

Transitional Kitchen Applications

Transitional kitchens combine familiar traditional materials with cleaner lines. A straight-sided or gently curved copper hood can add warmth while preserving visual restraint.

Smooth or lightly hammered surfaces, modest straps, and simple aprons work well with shaker cabinets, marble, quartz, and understated hardware.

Modern Kitchen Applications

A wall-mounted copper hood can become the primary handcrafted feature in a modern kitchen. Flat-panel cabinets, slab stone, stainless appliances, concrete, and simple walls allow the metal to stand out.

Minimal ornament and a geometric silhouette generally integrate best with contemporary architecture.

Compatible Styles

  • Farmhouse: Warm handcrafted focal point
  • Spanish Colonial: Historic metal character
  • Traditional: Decorative architectural detail
  • Transitional: Balanced old and new
  • Modern: Sculptural material contrast

Industrial and Loft Kitchens

Copper softens exposed brick, concrete, steel, black-framed windows, and open shelving. Visible seams, rivets, and iron straps reinforce the fabricated quality of the room.

A natural or dark patina can be selected depending on whether the hood should feel warmer or more restrained.

Pairing Copper with Stainless Steel

A stainless range can sit beneath a copper hood without appearing mismatched. The contrast becomes intentional when both metals are repeated through sinks, lighting, hardware, or accessories.

Black iron elements can create a visual bridge between warm copper and cooler stainless steel.

Pairing Copper with White Cabinets

White cabinetry provides one of the strongest backgrounds for copper. Natural finishes appear brighter, while antique and coffee patinas create deeper visual contrast.

Warm white and cream tones generally coordinate more naturally than very cool whites.

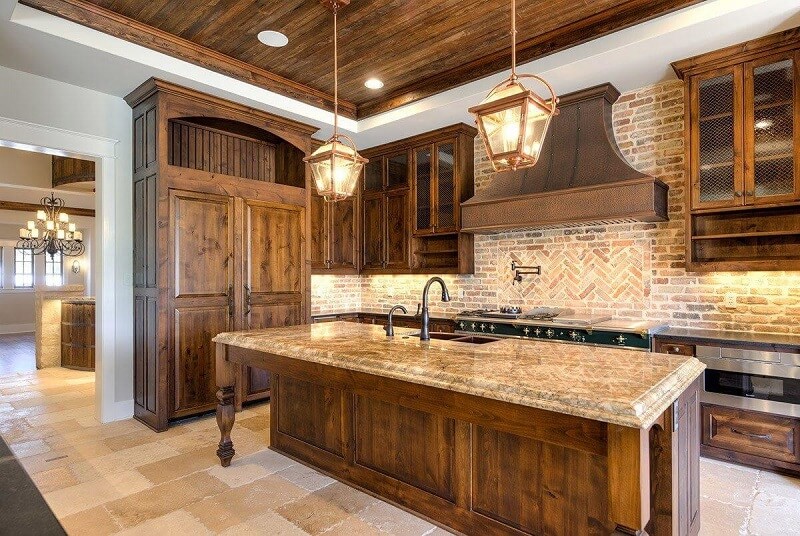
Pairing Copper with Wood Cabinets

Walnut, oak, cherry, and darker stains reinforce the warmth of the copper. The hood should remain sufficiently different in tone so its silhouette remains visible.

Iron or bronze hardware can connect the cabinets with straps, rivets, and surrounding lighting.

Cabinet Pairings

  • White: Strong copper contrast
  • Cream: Soft traditional warmth
  • Oak: Relaxed natural balance
  • Walnut: Rich material depth
  • Gray: Transitional coordination

Professional Wall Installation

A copper hood can be substantial in size and weight. The mounting wall must contain adequate framing or another structural support system.

The enclosure should not rely solely on finished drywall, tile, plaster, or decorative panels.

Coordinating Wall Support

The contractor should review the hood weight, attachment points, insert, ductwork, and surrounding cabinetry before the wall is closed. Blocking may need to be added during construction.

Existing walls should be inspected before a large replacement hood is ordered.

Protecting the Copper During Installation

The hood should remain covered while surrounding plaster, tile, cabinetry, paint, and countertops are completed. Grout, adhesive, tools, and construction dust can damage the patina.

Installers should use clean gloves and padded handling surfaces.

Installation Checklist

  • Support: Prepare structural framing
  • Insert: Confirm exact equipment
  • Duct: Verify route and diameter
  • Electrical: Plan power access
  • Protection: Cover copper finish

Cleaning the Copper Surface

Use mild soap, warm water, and a soft cloth to remove dust, fingerprints, and cooking residue. Dry the surface gently after cleaning.

Avoid abrasive pads, bleach, ammonia, strong acids, and aggressive copper cleaners that may damage or remove the patina.

Should a Copper Hood Be Polished?

Polishing may remove antique, coffee, oxidized, or fire-aged finishes. It should only be used when the hood was ordered with a bright polished surface and the care instructions approve it.

Gentle cleaning is preferable for most artisan patinas.

Optional Waxing

A compatible copper wax may be used when recommended for the selected finish. It can provide additional protection and help preserve the sheen.

The correct product and application schedule depend on the patina, protective coating, and kitchen conditions.

Copper Care Tips

  • Clean: Mild soap and water
  • Use: Soft cloth
  • Dry: Remove moisture gently
  • Avoid: Harsh chemical cleaners
  • Patina: Expect natural aging

Maintaining the Ventilation Filters

Grease filters should be cleaned or replaced according to the insert manufacturer’s instructions. Neglected filters can reduce airflow and increase residue inside the enclosure.

The copper shell and mechanical insert may require different cleaning methods.

Blower and Duct Maintenance

Reduced airflow, persistent odors, or unusual noise may indicate that the filters, blower, or ductwork require inspection. Mechanical servicing should follow the ventilation manufacturer’s guidance.

Professional service may be necessary when internal components are difficult to access.

Made-to-Order Production

Wall-mounted copper hoods are produced individually according to the approved dimensions, silhouette, mounting configuration, texture, patina, decorative details, and insert information.

All decisions should be finalized before fabrication begins because late changes may affect compatibility, appearance, cost, or delivery timing.

Finish Samples

Samples can help compare natural, antique, honey, coffee, dark, polished, and oxidized copper. They represent the general finish direction rather than an exact match to the completed hood.

Lighting, hammering, copper sheet variation, and hand-applied patina influence the final appearance.

Production and Delivery

After fabrication, the hood is inspected, protected, packed in a crate, transported for export, processed through customs, and transferred to a domestic freight carrier.

Timing depends on the level of customization, insert preparation, packing, customs processing, and destination.

Production Stages

  • Fabrication: Handmade copper construction
  • Finishing: Texture and patina application
  • Inspection: Review before packing
  • Crating: Protection for freight
  • Delivery: Final carrier transport

Inspecting the Freight Shipment

Inspect the crate before signing the delivery receipt. Visible damage should be noted on the carrier paperwork and photographed immediately.

Retain all packaging until the hood has been unpacked and reviewed fully.

Understanding Handmade Expectations

Small dimensional differences, irregular hammer marks, tonal variation, forming marks, subtle asymmetry, and visible artisan character are normal in handmade copper.

These features should be distinguished from severe dents, punctures, structural deformation, or transportation damage.

Why a Custom Wall-Mounted Hood Stands Apart

Factory-made hoods provide fixed dimensions, limited finishes, and standardized forms. A handmade copper enclosure can respond to the actual range, cabinets, ceiling, wall, duct route, insert, and design style.

The finished hood becomes an integrated architectural feature rather than an ordinary appliance added after the kitchen is designed.

Ordering and Project Planning

Before ordering, confirm the hood width, height, depth, mounting clearance, silhouette, surface texture, patina, straps, rivets, apron, crown, range dimensions, cabinet opening, wall support, duct route, electrical service, and exact ventilation insert.

Visit the wall-mounted copper range hood product page, compare additional copper vent hood designs, and explore coordinating rustic lighting fixtures before completing the kitchen plan.

Conclusion

Wall-mounted copper range hoods combine practical placement, made-to-order dimensions, handcrafted copper texture, evolving patina, decorative customization, and insert-ready construction for kitchens where the range sits against a wall. Their silhouettes can be curved, tapered, trapezoidal, box-shaped, or compact, allowing them to support farmhouse, Spanish Colonial, Hacienda, traditional, transitional, industrial, and modern interiors. With accurate measurements, complete insert documentation, properly prepared wall support, coordinated ductwork, professional installation, careful freight inspection, and gentle maintenance, a custom copper hood becomes a lasting architectural centerpiece that unites kitchen ventilation with Mexican artisan craftsmanship.