 US Dollar
 Euro
Euro
 Australian Dollar
 Canadian Dollar
 Polish Zloty
 British Pound

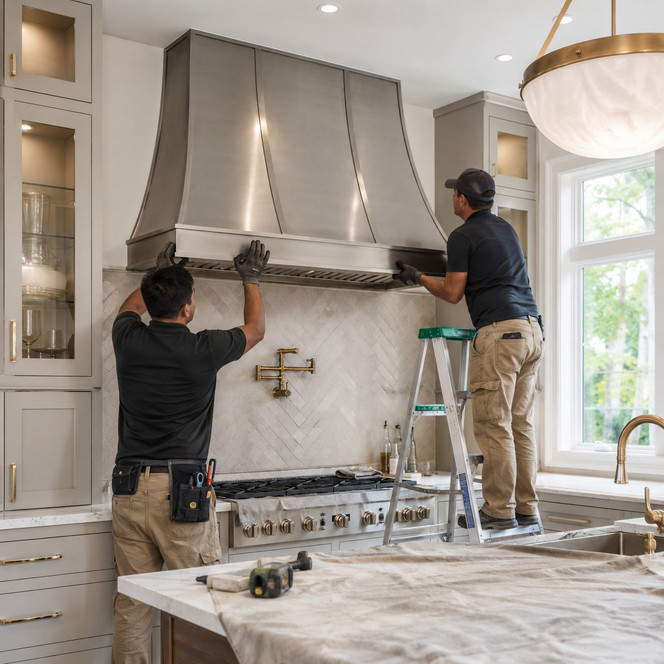
Rustica House metal range hood installation begins with choosing the correct mounting configuration for the kitchen layout. A wall-mount hood is secured against a finished wall above a range or cooktop, an island hood is suspended from the ceiling over a central cooking surface, and an under-cabinet hood fits beneath upper cabinetry. Although each configuration performs the same basic ventilation function, the structural support, duct route, finished surfaces, measurements, and installation sequence differ substantially. The hood shell, ventilation insert, cabinetry, electrical supply, ductwork, and cooking appliance must therefore be planned together before fabrication begins. Browse the complete custom metal range hood collection to compare copper, zinc, iron, brass, and mixed-metal designs for wall-mount, kitchen island, and under-cabinet installation. This guide explains the primary differences among these configurations, including sizing, support, clearances, ventilation preparation, installation planning, and common mistakes.
Blog Summary
- Wall mount: Supported against a wall
- Island: Suspended from ceiling framing
- Under-cabinet: Installed below cabinetry
- Insert: Confirm before fabrication
- Ducting: Plan the complete route
- Support: Attach to structural framing
- Clearance: Follow appliance requirements
- Installer: Use qualified professionals
Understanding the Three Installation Types
The installation type is determined primarily by the position of the cooking appliance. A range located against a wall normally requires a wall-mount or under-cabinet hood. A cooktop located in the center of the room generally requires an island hood. The visible shape may be similar among these versions, but the shell construction and support requirements are not interchangeable.
A wall-mount hood has a flat back designed to sit against the wall. Its front and side surfaces are finished, while the wall conceals the rear panel. An island hood is visible from every direction, so all four sides must be finished. It also requires a ceiling connection capable of carrying the hood’s weight and resisting movement. An under-cabinet hood is shorter and shallower than many full-height wall hoods because it must fit below an upper cabinet rather than extend toward the ceiling.
The wall-mount and island range hood guide provides additional design comparisons between these two prominent installation formats.
Wall-Mount Metal Range Hood Installation
A wall-mount metal range hood is installed above a range or cooktop positioned against a kitchen wall. This is the most common configuration because the wall can contain electrical wiring, ductwork, blocking, and structural attachment points. The hood may be installed between cabinets, beside open shelves, inside a framed surround, or as a freestanding architectural feature.
The hood’s flat back rests against the finished wall, while the bottom opening surrounds the ventilation insert or liner. Depending on the design, the chimney may extend to the ceiling or stop below it. A full-height chimney creates a continuous architectural connection, while a shorter hood may leave visible wall space above the crown.
Structural Support for Wall Installation
A handcrafted metal hood can be heavy, particularly when it is wide, tall, fitted with decorative bands, or made with substantial internal framing. The fasteners must connect to wall studs, structural blocking, masonry, or another load-bearing assembly. Drywall alone is not suitable for supporting the hood.
Blocking should ideally be installed before the wall is closed. When remodeling an existing kitchen, the installer may need to open the wall to add support at the hood’s attachment points. The precise bracket locations depend on the shell and internal frame, so the installer should review the hood drawings and mounting provisions before finishing the wall.
Wall Ducting Options
A wall-mounted hood may vent vertically through the ceiling or horizontally through an exterior wall, depending on the insert outlet and building layout. Vertical ducting is often used when the hood chimney conceals the duct. Rear venting can provide a shorter route when the cooking wall is an exterior wall and the selected insert permits horizontal discharge.
The duct should use the diameter specified by the ventilation equipment manufacturer. Reducing the duct size, adding numerous elbows, or creating a long restrictive route can reduce airflow and increase noise. The complete route should be confirmed before the hood is ordered, not after it arrives.
Wall-Mount Planning Advantages
- Support: Wall framing provides secure attachment
- Ducting: Vertical or rear discharge may be possible
- Design: Hood can integrate with cabinets or stand alone
- Cost: Installation is generally simpler than an island hood
- Access: Electrical and duct connections are easier to conceal
Kitchen Island Metal Range Hood Installation
An island range hood is suspended over a cooktop located away from the walls. Because it is visible from the front, back, and both sides, the entire shell must be finished. The hood often becomes one of the most prominent elements in an open-plan kitchen, making symmetry, scale, ceiling alignment, and viewing angles especially important.
Island installations require more structural planning than wall installations. The hood cannot rely on a wall for lateral support, and all weight must transfer to the ceiling structure. The duct and electrical supply must also travel through the ceiling connection.
Ceiling Framing and Attachment
An island hood must be anchored to ceiling joists, engineered blocking, structural steel, or another approved support system. Decorative ceiling material, drywall, thin wood cladding, and suspended ceiling components cannot carry the load by themselves.
The framing should be designed around the hood’s mounting frame and final position over the cooktop. When joists do not align with the required attachment points, additional blocking may be necessary. On high, sloped, vaulted, or coffered ceilings, the project may require a custom support structure or transition enclosure.
The installer should also account for lateral movement. A properly supported island hood should remain stable when filters are removed, controls are operated, or air moves through the room. Long narrow chimney sections may require additional internal reinforcement.
Centering an Island Hood
The hood should be centered over the cooking surface rather than merely aligned with the island countertop. This distinction matters when the cooktop is not positioned exactly in the center of the island. Before framing the ceiling opening, confirm the final appliance location, countertop overhang, cabinet layout, hood width, and duct centerline.
The hood should also be evaluated from nearby rooms and primary walkways. A small alignment error that is difficult to notice at the cooktop may become obvious across an open living space. Ceiling lights, beams, pendants, and architectural details should be coordinated with the hood before installation.
Island Ducting
An island hood normally vents vertically because there is no adjacent wall for rear discharge. The duct rises through the hood chimney and ceiling before continuing through the floor structure, attic, roof, or another approved route to the exterior.
Ceiling joists, plumbing, electrical wiring, HVAC equipment, and upper-floor rooms may affect the duct path. These conditions should be investigated early. Moving the cooktop or adjusting the hood position before cabinetry is installed is usually easier than rerouting structural or mechanical systems later.
Island Installation Advantages and Limitations
- Focal point: Finished metal is visible from every side
- Open layout: Defines the central cooking zone
- Ventilation: Captures cooking exhaust above an island
- Support: Requires reinforced ceiling framing
- Ducting: Usually limited to vertical discharge
- Cost: More complex than a typical wall installation
Under-Cabinet Metal Range Hood Installation
An under-cabinet metal range hood fits beneath an upper cabinet located above the range. This configuration preserves cabinet storage and works well where the available height is too limited for a full wall-mounted canopy and chimney. It can also provide a handcrafted focal point in a compact kitchen without occupying the entire cooking wall.
Rustica House under-cabinet copper hoods are commonly proportioned at approximately 10 inches high and 20 inches deep, with widths selected to coordinate with the range and cabinet opening. Width options can include 28, 30, 36, 42, 48, 54, 60, 66, 72, and 78 inches, depending on the model and project requirements.
For more information about the compact format, dimensions, finishes, and cabinet integration, review the under-cabinet hammered copper hood guide.
Cabinet Preparation
The upper cabinet must be capable of supporting the hood and any internal ventilation equipment. The installer may need to reinforce the cabinet with plywood, framing, or structural blocking connected to wall studs. Thin cabinet bottoms and decorative face frames should not be assumed to provide sufficient support.
The insert, duct, electrical supply, and mounting hardware may occupy part of the cabinet interior. Buyers should decide whether preserving storage is more important than concealing the ventilation equipment completely. A false cabinet front or modified interior shelf may be used to hide the duct while maintaining a finished appearance.
Fitting the Hood Between Cabinets
Measure the finished opening between the adjoining cabinets rather than relying only on the cabinet plan. Wall irregularities, filler strips, face-frame projections, tile thickness, and cabinet installation tolerances can change the usable space.
The hood should fit cleanly without being forced between cabinet sides. Small planned clearances may be useful for installation, but oversized gaps can make the hood appear undersized. Decorative trim or filler pieces should be planned before fabrication rather than improvised after delivery.
Under-Cabinet Vent Routing
The duct usually passes upward through the cabinet and ceiling, although rear venting may be possible with compatible equipment and an exterior wall. The insert outlet, cabinet depth, duct diameter, and transition fittings must all fit within the available space.
Compact installation does not mean ventilation requirements can be ignored. A high-capacity insert may require more vertical room, a larger duct, deeper internal clearance, and greater service access than the cabinet can provide. Insert selection should therefore occur before the hood and cabinet modifications are finalized.
Selecting the Correct Hood Width
The hood should generally be at least as wide as the cooking surface. Additional width can improve the capture area, especially for powerful ranges, island installations, or cooking methods that generate substantial heat, smoke, grease, and steam. Available cabinet space, ceiling features, and visual proportion may limit how much additional width can be used.
A wall hood may extend beyond the range when surrounding cabinets permit. An island hood often benefits from generous coverage because cross-drafts and open-room air movement can carry cooking exhaust away from the canopy. An under-cabinet hood is usually constrained by the cabinet opening and should be coordinated precisely with the adjoining cabinetry.
Width alone does not determine performance. Hood depth, mounting height, canopy shape, insert design, fan capacity, ducting, and room airflow all affect capture.
Determining Mounting Height
The mounting height is the vertical distance between the cooking surface and the bottom of the hood. The correct distance depends on the range manufacturer, insert manufacturer, fuel type, local building requirements, hood depth, and project design.
A hood mounted too high may allow smoke and steam to escape before entering the capture area. A hood mounted too low can interfere with cooking, sightlines, heat safety, and access to rear burners. The final position should satisfy the strictest applicable requirement among the appliance, ventilation equipment, local code, and installer recommendations.
Mounting height also affects the overall hood dimensions. Once the distance above the cooktop and ceiling height are known, the remaining vertical space determines the appropriate shell and chimney height.
Insert and Blower Planning
The decorative metal shell and the ventilation equipment are separate components that must be coordinated. Rustica House can supply the optional 200 CFM insert only. This unit includes a two-speed fan, lights, and filters and may be appropriate for lighter residential ventilation needs.
Custom metal hood shells can also be prepared for buyer-supplied internal inserts up to 1,260 CFM and buyer-supplied external blowers up to 1,500 CFM when complete specifications are provided before production. The appropriate capacity depends on the cooking appliance, fuel type, kitchen volume, cooking habits, duct route, and applicable code requirements.
Before fabrication, provide the insert manufacturer, model number, overall dimensions, cutout dimensions, mounting flange, duct diameter, outlet position, control location, lighting arrangement, filter access, and installation instructions. The range hood insert planning guide explains these requirements in greater detail.
Internal Versus External Blowers
An internal blower is located inside the insert or hood assembly. It simplifies equipment coordination but places the motor close to the cooking area. Noise depends on the blower design, fan speed, duct restriction, hood construction, and room acoustics.
An external blower places the motor farther away, commonly on the roof or an exterior wall. This arrangement may reduce perceived motor noise in the kitchen, although airflow and duct noise may still be audible. External systems require compatible controls, wiring, ducting, weather protection, service access, and careful coordination between the hood and blower manufacturers.
Remote or inline blower systems should never be assumed to work with every insert. All components must be approved for use together.
Ductwork Requirements
Ductwork should be smooth, rigid, correctly sized, and routed as directly as practical. Flexible duct can create resistance, trap grease, increase noise, and may not meet applicable requirements. The installer should avoid unnecessary elbows, abrupt transitions, reductions, and excessively long runs.
The exhaust should terminate outdoors through an approved wall or roof cap. It should not discharge into an attic, crawlspace, cabinet cavity, wall cavity, garage, or another interior space. Backdraft protection, weather sealing, roof flashing, and exterior clearances should be handled according to the ventilation manufacturer’s instructions and local requirements.
Ductless or recirculating installation may be possible for selected equipment, but it does not remove heat, humidity, or combustion byproducts from the building. Recirculating systems filter the air and return it to the room, making them different from fully ducted ventilation.
Electrical and Make-Up Air Planning
The insert may require electrical power for the fan, lights, controls, and any remote blower connection. Electrical work should be completed by a qualified professional according to the equipment specifications and applicable regulations. Junction boxes and service connections must remain accessible where required.
High-capacity ventilation can remove a substantial volume of indoor air. Depending on the blower capacity, building tightness, local regulations, and presence of fuel-burning appliances, a make-up air system may be required. This system replaces exhausted air in a controlled manner and helps prevent pressure problems within the home.
Make-up air requirements should be evaluated before selecting a powerful insert or external blower. They should not be treated as an afterthought after the hood has been installed.
Installation Sequence
- Confirm the appliance: Record range width, fuel type, output, and manufacturer clearances
- Select installation type: Choose wall mount, island, or under-cabinet construction
- Choose ventilation: Confirm the exact insert, blower, duct size, and discharge direction
- Measure the space: Verify ceiling height, cabinet opening, hood width, depth, and mounting height
- Plan support: Add wall blocking, cabinet reinforcement, or ceiling framing
- Route utilities: Prepare ducting, electrical connections, and make-up air when required
- Review drawings: Confirm dimensions and insert preparation before fabrication
- Prepare the site: Complete structural work before closing walls or ceilings
- Install the hood: Lift and secure the shell using proper equipment and qualified installers
- Connect and test: Install filters, verify controls, check airflow, and inspect for vibration
Common Installation Mistakes
- Late insert selection: Ordering the shell before choosing ventilation equipment
- Weak support: Attaching the hood only to drywall or decorative cabinet material
- Wrong dimensions: Measuring unfinished openings instead of completed surfaces
- Restricted ducting: Using undersized ducts or numerous sharp elbows
- Poor alignment: Centering the hood on cabinetry instead of the cooking surface
- Insufficient access: Blocking filters, lights, controls, or service panels
- Ignored clearances: Choosing appearance over appliance safety requirements
- No make-up air review: Installing a powerful blower without evaluating building pressure
Handcrafted Metal Considerations
Custom copper, zinc, brass, and iron hoods are handcrafted rather than stamped as identical factory shells. Surface variation, patina movement, hammer marks, seam differences, rivet placement variation, tool marks, and small irregularities are part of artisan production and should not be considered defects.
The installer should handle finished surfaces carefully. Protective materials should remain in place when practical, but tape, adhesives, abrasive pads, and harsh cleaners should not be applied to the metal without approval. The hood should be lifted by its structural frame rather than by decorative straps, apron edges, or crown details.
FAQ - Metal Range Hood Installation
A: A wall hood has a flat unfinished or concealed back and attaches to wall framing. An island hood is finished on all four sides and must be suspended from reinforced ceiling framing.
A: The same design may often be ordered in either configuration, but the construction must be specified before production. Wall and island shells have different finished surfaces, mounting provisions, and ducting considerations.
A: An under-cabinet hood is a compact shell designed to fit directly beneath an upper cabinet. Its height and depth are planned around the cabinet opening, insert, duct route, and available storage space.
A: Yes. The exact insert or blower system should be confirmed before fabrication so the shell, opening, internal support, duct outlet, controls, lighting, and service access can be prepared correctly.
A: It should attach to wall studs, structural blocking, ceiling joists, engineered framing, masonry, or another approved load-bearing assembly. Drywall and decorative cabinet panels alone are not adequate.
A: An island hood normally vents vertically through the ceiling because it has no adjacent wall. The duct may change direction above the ceiling when the structure and equipment specifications permit.
A: Possibly, but compact cabinet space may limit insert height, depth, duct diameter, and service access. The insert specifications must be reviewed before the hood and cabinet are finalized.
A: Rustica House can supply the optional 200 CFM insert only. Custom shells can be prepared for buyer-supplied internal inserts up to 1,260 CFM and external blowers up to 1,500 CFM when complete specifications are provided before production.
A: Selected inserts may support recirculating operation, but compatibility must be confirmed with the equipment manufacturer. A ductless system filters and returns air to the kitchen rather than exhausting it outdoors.
A: Installation should be coordinated by qualified contractors familiar with structural support, ventilation, electrical work, cabinetry, appliance clearances, and local building requirements.
Plan the Installation Before Production
A successful metal range hood installation depends on decisions made before the hood reaches the jobsite. Wall-mount installations require secure wall framing and a planned vertical or rear duct route. Island hoods require reinforced ceiling support, precise alignment, four finished sides, and vertical ventilation. Under-cabinet hoods require accurate cabinet openings, internal reinforcement, compact insert planning, and careful coordination of storage space.
Confirm the cooking appliance, hood dimensions, mounting height, installation type, insert model, duct route, electrical supply, structural support, and make-up air requirements before approving fabrication. When these elements are coordinated early, the finished hood can function as both effective ventilation equipment and a permanent architectural feature of the kitchen.