 US Dollar
 Euro
Euro
 Australian Dollar
 Canadian Dollar
 Polish Zloty
 British Pound

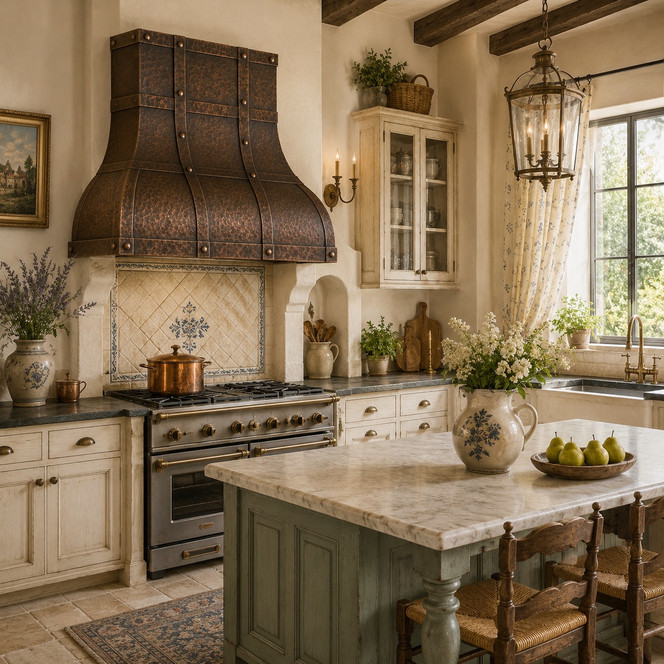
The copper dome range hood with architectural strap grid combines a broad rounded canopy with a disciplined arrangement of vertical and horizontal metal bands. The dome introduces soft architectural volume above the cooking surface, while the strap grid divides the hammered copper body into balanced panels that emphasize proportion rather than ornate relief. A straight lower apron anchors the composition, and the compact upper transition keeps the hood visually connected to cabinetry, plaster, stone, tile, and ceiling details. Made to order for wall-mounted or kitchen island installations, the hood can be customized for width, height, depth, copper texture, patina, strap finish, rivet size, and ventilation preparation. This guide explains the dome shape, grid architecture, handcrafted construction, sizing, installation, insert planning, kitchen compatibility, and long-term care. Browse kitchen inspiration featuring a copper dome range hood with an architectural strap grid in our copper dome hood lifestyle images.
Blog Summary
- Shape: Rounded dome canopy
- Detail: Architectural strap grid
- Texture: Hammered copper surface
- Apron: Straight lower structure
- Mounting: Wall or kitchen island
- Sizing: Made to order
- Finish: Artisan copper patinas
- Ventilation: Insert-ready shell

Understanding the Dome Shape
The rounded canopy is the defining architectural feature of this hood. Unlike a box, pyramid, or straight trapezoid, the dome expands outward through a continuous convex curve. The upper section begins relatively narrow and gradually becomes broader toward the apron, producing a full and substantial profile above the range.
This geometry softens the straight lines created by cabinetry, appliances, tile joints, and countertops. It also provides enough visual weight to balance a wide professional range without making the hood feel rigid or industrial. The broad curved surface creates an effective background for hammered texture, artisan patina, straps, and rivets.
A dome hood differs from a bell hood because the body remains fuller through the middle. Bell profiles often include a more pronounced inward curve before flaring toward the apron. Buyers comparing these forms can review the copper range hood shapes guide before selecting the final silhouette.
Architectural Strap Grid
The grid gives this hood its structured identity. Vertical and horizontal straps cross the curved copper body to form a pattern of framed sections. Instead of covering the dome with embossed motifs, scrollwork, or carved decoration, the design uses measured band placement to create rhythm and depth.
Vertical straps emphasize height and guide the eye toward the upper transition. Horizontal bands reinforce the hood’s width and divide the dome into distinct visual zones. Their intersection creates a balanced architectural pattern that remains visible even when the body and straps use similar finishes.
The number and spacing of the straps should be adjusted to the final hood dimensions. A smaller hood needs fewer or narrower bands so the canopy does not appear crowded. A wider hood can support additional divisions because the larger copper surface provides more room for the grid. Strap placement should be approved on a proportional drawing before fabrication begins.
Grid Design Benefits
- Structure: Organizes broad copper fields
- Height: Vertical bands draw upward
- Width: Horizontal bands add balance
- Shadow: Raised metal creates depth
- Character: Reinforces hand fabrication
Straps and Rivets
The straps may be produced in matching copper or another approved metal, depending on the desired contrast. Matching copper creates a unified appearance in which shadows and patina variation define the grid. Darker straps make the panel pattern more visible and can connect the hood with blackened hardware, iron lighting, or darker appliances.
Rivets add evenly spaced points of texture along the bands. Their diameter, spacing, and finish influence whether the hood feels refined, rustic, industrial, or Spanish Revival. Smaller rivets create a quieter architectural rhythm, while larger fasteners strengthen the handcrafted and old-world character.
Because the straps follow a curved body rather than a flat plane, slight adjustments in rivet spacing may be necessary across the dome. These minor differences are expected in artisan metalwork and do not affect the structural or visual integrity of the hood.
Hammered Copper Surface
The hammered texture creates visual movement beneath the strap grid. Hand-applied impressions scatter light across the curved canopy, causing the hood to change appearance throughout the day. Windows, recessed lighting, pendants, and under-cabinet lights can reveal different highlights across the same copper surface.
The texture also creates contrast between the copper field and the raised straps. Even when both use the same patina, the bands remain more defined because they reflect light differently. Fine hammering gives the hood a more controlled and refined surface, while larger irregular marks create stronger rustic character.
No two hammered hoods will look exactly alike. Differences in hammer depth, spacing, direction, seams, edges, and patina are natural results of handmade production. These characteristics distinguish the hood from embossed or machine-stamped metalwork.
Choosing the Copper Patina
Patina changes how strongly the grid and dome appear. Natural copper introduces reddish, amber, and golden tones. Honey patina creates a softer golden warmth that pairs well with light wood and cream cabinetry. Antique finishes add medium brown variation, while Coffee patina shifts the surface toward deep bronze and dark brown.
A dark body with lighter straps can make the grid more visible without using a different material. Dark straps over natural copper create stronger graphic contrast. A single patina across the dome, straps, and rivets produces a quieter result in which the architecture is defined mainly by raised edges and shadow.
The curved body may show more tonal variation than a flat hood because different sections receive light at different angles. Patina also collects differently around rivets, band edges, seams, and hammered recesses. Buyers can compare common finish directions in the copper patina finish guide.
Front Elevation and Proportion
The proportional drawing shows how the dome, apron, upper transition, and strap grid work together from the front. This view is especially important for wall-mounted installations because the hood is normally seen directly across the kitchen.
The centerline should align with the cooking appliance, backsplash, cabinetry, ceiling details, and any decorative tile panel. Wider hoods need enough height to preserve the rounded dome shape. If a broad hood is made too short, the body may appear flattened and the strap grid may lose its architectural balance.
A narrow hood with excessive height can appear stretched. The upper transition, apron, strap spacing, and dome curvature should therefore be reviewed as one composition rather than treated as separate decorative choices.

Custom Size Planning
The hood can be produced to coordinate with residential and professional cooking appliances. Common planning ranges include widths from approximately 24 to 78 inches, heights from 24 to 72 inches, and a standard depth near 24 inches. Final dimensions should reflect the range, ceiling, cabinet layout, mounting position, insert, and duct route.
The hood should generally be at least as wide as the cooking surface. Additional side coverage may improve capture and create stronger visual balance where space allows. A large professional range often benefits from a wider and deeper hood than a compact residential cooktop.
Height should be planned after confirming the finished ceiling and the required mounting distance above the cooking surface. Depth affects both appearance and capture performance. Reducing depth may make the hood feel lighter, but it can also allow steam and smoke to escape beyond the front edge.
| Planning Detail | Buyer Confirmation |
|---|---|
| Range width | Confirm appliance model |
| Hood width | Plan capture and balance |
| Overall height | Measure finished ceiling |
| Hood depth | Coordinate with cooktop |
| Strap layout | Approve grid drawing |
| Insert model | Supply full specifications |
Wall-Mounted Installation
A wall-mounted version has a flat rear surface and is designed to attach to structural framing within the cooking wall. It may be installed between cabinets, beside open shelves, or against a broad plaster, tile, brick, or stone backsplash.
The hood must be centered above the appliance and secured to suitable structural support. A large copper shell with straps, rivets, reinforcement, and a ventilation insert can be heavy. Drywall, decorative tile, and thin cabinet panels alone are not adequate attachment surfaces.
The duct may rise through the upper section or exit through the rear when the selected insert and wall conditions permit. The duct route, electrical service, backsplash thickness, and finished mounting height should all be confirmed before the hood enters production.
Kitchen Island Installation
An island version must be finished on all four sides because it is visible from multiple directions. The strap grid should remain balanced across the front, rear, and sides so the hood appears complete from the kitchen, dining area, and adjoining living space.
Island installation requires reinforced ceiling framing, a planned vertical duct route, electrical service, and precise alignment with the cooktop. The hood should be centered over the cooking appliance rather than merely centered on the island countertop.
The rounded dome works well above an island because its curved sides reduce the visual harshness of a large suspended object. The grid keeps the canopy structured, while the broad volume gives the fixture enough presence for open-plan rooms. Compare both mounting types in the wall and island hood guide.
Best Kitchen Styles
Spanish Colonial Kitchens
Hammered copper, riveted straps, plaster walls, dark wood, handmade tile, terracotta, and iron lighting create a natural setting for the dome shape. Darker straps can reinforce blackened metal details elsewhere in the room.
Tuscan and Mediterranean Kitchens
Stone, cream cabinetry, warm wood, limestone, and muted ceramic tile provide an effective background. Antique or Coffee patina can give the hood an established appearance without requiring embossed scenes or heavy scrollwork.
Rustic Transitional Kitchens
The strap grid provides enough structure for cleaner cabinetry, while the rounded body prevents the hood from appearing too industrial. Pair it with Shaker doors, white oak, quartzite, bronze hardware, and a restrained backsplash.
Luxury Traditional Kitchens
A wide dome hood can balance detailed cabinetry, tall ceilings, substantial ranges, and broad stone surfaces. The grid adds scale and order, while a coordinated patina prevents the copper from competing with decorative millwork or strong stone veining.
Ventilation Insert Planning
The copper shell creates the exterior architecture, while the insert provides airflow, filters, lighting, controls, and the duct connection. Rustica House can supply the optional 200 CFM insert only. This compact two-speed unit includes lights and filters and may suit lighter residential cooking.
The hood can also be prepared for buyer-supplied internal inserts up to 1,260 CFM and external blowers up to 1,500 CFM when complete specifications are submitted before production. Required information includes the manufacturer, model, housing dimensions, cutout, mounting flange, duct outlet, controls, lighting, and filter access.
The insert must be selected before the hood’s internal structure is finalized. Changing equipment later may require a different liner opening, support frame, duct location, or apron depth. The custom range hood insert guide explains this planning process in greater detail.
Installation Preparation
Professional installation is recommended. Confirm the finished appliance position, hood centerline, mounting height, backsplash thickness, wall or ceiling support, electrical supply, duct route, and insert access before delivery.
Protect the copper during construction. Grout, mortar, adhesives, metal tools, abrasive cloths, and harsh cleaners can damage the patina. The hood should be lifted from its structural frame rather than from straps, rivets, apron edges, or upper trim.
Test-fit the insert and verify duct alignment before permanently securing the shell. Final installation should follow the approved drawing, ventilation equipment instructions, and applicable local requirements.
Cleaning and Patina Care
Clean the hood with mild soap, warm water, and a soft cloth. Avoid bleach, ammonia, vinegar, abrasive pads, steel wool, powdered products, aggressive degreasers, and unapproved metal polish. These materials may scratch the copper or disturb the finish.
Wipe carefully around straps, rivets, seams, and hammered depressions where grease can collect. Dry the surface after cleaning to reduce water spots. Filters should be maintained according to the insert manufacturer because filter condition directly affects ventilation performance.
Natural copper and artisan patinas may change gradually with air exposure, humidity, heat, and handling. These changes are part of the living character of genuine copper.
FAQ - Copper Dome Hood
A: It combines a broad rounded dome canopy with a coordinated grid of vertical and horizontal straps, raised rivets, hammered copper texture, and a straight lower apron.
A: A dome hood has a fuller outward curve, while a bell hood often narrows through a concave section before widening toward the apron.
A: Yes. Strap spacing, width, count, placement, material, rivet size, and finish may be adjusted before fabrication.
A: Yes. Matching copper creates a unified appearance, while darker copper or another approved metal can make the grid more visible.
A: Yes. A wall-mounted version has a flat rear surface and is prepared for structural attachment to the cooking wall.
A: Yes. An island version can be finished on all four sides and prepared for reinforced ceiling support and vertical ducting.
A: Hammered copper is especially suited to the design because it adds movement beneath the strap grid. Smooth or alternative textures may also be reviewed.
A: Natural, Honey, Antique, and Coffee finishes can all work. The best choice depends on whether the straps should blend with or contrast against the body.
A: Rustica House can supply the optional 200 CFM insert only. Buyer-supplied internal inserts up to 1,260 CFM and external blowers up to 1,500 CFM may also be accommodated with complete specifications.
A: No. Hammering, patina, strap alignment, rivet placement, seams, tool marks, and tonal variation differ naturally from one handmade hood to another.
Plan the Architectural Grid
The copper dome range hood with architectural strap grid is suited to kitchens that need rounded canopy volume, visible metalwork structure, and handcrafted copper character above the cooking surface. The dome softens the range wall, while vertical and horizontal bands divide the canopy into balanced sections. Rivets, hammered texture, and patina add depth without relying on embossed scenes or ornate scrollwork.
Before ordering, confirm the range dimensions, hood width, height, depth, wall or island mounting, strap-grid layout, rivet treatment, patina, insert model, duct route, structural support, backsplash thickness, and installation access. When these elements are coordinated through the approved drawing, the finished hood can function as both a ventilation enclosure and a carefully proportioned architectural centerpiece.