 US Dollar
 Euro
Euro
 Australian Dollar
 Canadian Dollar
 Polish Zloty
 British Pound

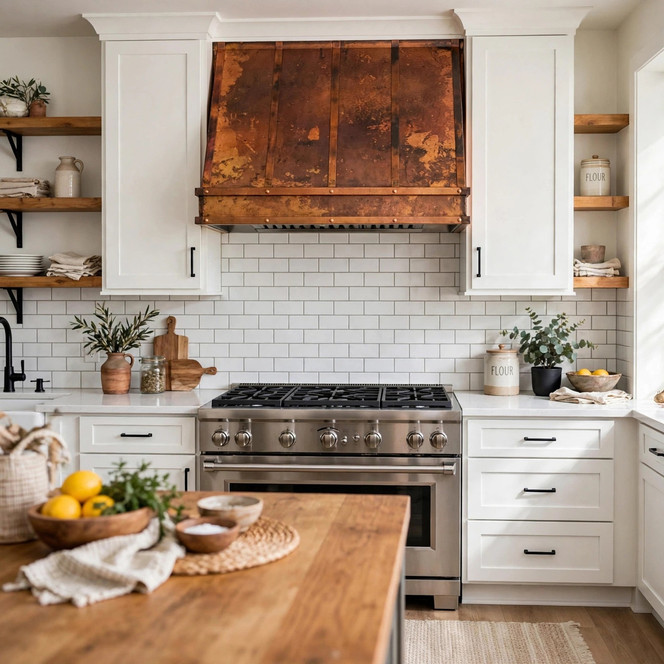
Under-Cabinet Copper Hood: Sleek Artisan Ventilation with Handcrafted Character
An Under-Cabinet Copper Hood combines compact proportions, handcrafted metalwork, and practical kitchen ventilation in a design created to fit beneath upper cabinetry. Its box-style silhouette, horizontal trim bands, vertical copper straps, and warm hand-finished patina give the hood a refined architectural presence without requiring the height of a traditional chimney model. This makes it especially suitable for kitchens where cabinetry occupies the wall above the cooking surface. Handcrafted from 16-gauge copper and available in customizable dimensions and patina options, the hood can complement transitional, farmhouse, Colonial, rustic, Mediterranean, and contemporary interiors while preserving valuable cabinet space.
Blog Summary
- Product: Under-cabinet copper hood
- Material: 16-gauge copper
- Design: Compact box-style profile
- Details: Vertical straps and horizontal trim
- Customization: Size, patina, and ventilation

Designed for Kitchens with Upper Cabinets
Traditional range hoods often require an open wall or tall chimney, but an under-cabinet hood is designed to fit directly beneath existing or planned cabinetry. Its reduced vertical profile makes efficient use of the available cooking wall.
The compact form allows the hood to remain decorative without dominating the room.
Why an Under-Cabinet Hood Makes Sense
In smaller kitchens or layouts where storage is important, keeping cabinetry above the range can be more practical than dedicating the entire wall to a tall decorative hood.
A copper enclosure adds warmth and craftsmanship while preserving the functional cabinet arrangement.
Under-Cabinet Advantages
- Compact: Uses limited vertical space
- Storage: Preserves upper cabinetry
- Design: Adds handcrafted metal detail
- Ventilation: Houses a dedicated insert
- Customization: Adaptable to cabinet dimensions
Box-Style Architectural Silhouette
The hood uses a relatively straight rectangular profile rather than a dramatic flared canopy. This geometry helps it fit neatly beneath cabinetry and gives the enclosure a cleaner, more controlled appearance.
The straightforward silhouette also makes decorative straps and trim more noticeable.
Strong Horizontal Proportions
Wide horizontal trim bands emphasize the hood’s width and visually connect it with the cabinetry above. These bands frame the recessed center panel and create an architectural border around the copper surface.
The effect recalls traditional millwork and mantel detailing.
Recessed Apron Detail
The front apron is visually framed by heavier horizontal trim, producing a layered surface instead of one completely flat copper face.
This subtle depth creates shadow lines that become more apparent under warm kitchen lighting.
Profile Characteristics
- Shape: Rectangular box-style body
- Apron: Recessed central surface
- Trim: Broad horizontal bands
- Height: Compact under-cabinet format
- Style: Clean architectural geometry
Vertical Copper Strap Details
Vertical straps introduce a strong rhythm across the face of the hood. The supplied design describes five straps distributed across the front, including a central strap and paired details toward each side.
These elements break up the broad copper surface without making the compact enclosure appear excessively ornate.
Why Vertical Straps Add Structure
Horizontal trim emphasizes width, while the vertical straps provide balance by directing the eye upward. The combination creates a subtle grid that gives the hood a more architectural appearance.
The straps also recall traditional metal chests, doors, gates, and early decorative ironwork.
Straps as Decorative Reinforcement
Although their primary role is visual, the bands create the impression of traditional constructed metalwork. Their repeated placement gives the hood a handcrafted, substantial quality.
The final strap arrangement may be coordinated with the overall width of the hood.
Strap Design
- Quantity: Five vertical accents
- Center: One central strap
- Sides: Paired side details
- Effect: Adds structural rhythm
- Style: Colonial-inspired metalwork
Handcrafted 16-Gauge Copper
The hood is produced from 16-gauge copper, providing a substantial metal enclosure suitable for a decorative kitchen appliance. The copper is formed and finished by hand rather than relying exclusively on standardized stamped panels.
This construction gives the finished hood more individual character.
Hand-Hammered Surface Texture
A subtle hammered finish creates small variations across the copper while preserving the clean geometry of the hood. The hammer marks catch light differently from one section to another.
This prevents the broad rectangular surface from feeling overly flat or industrial.
Natural Artisan Variation
Small differences in hammering, seams, patina, dimensions, strap alignment, and surface tone are expected from handcrafted production.
These variations help distinguish each hood from mass-produced metal appliances.
Copper Construction
- Material: 16-gauge copper
- Surface: Hand-hammered texture
- Fabrication: Made to order
- Variation: Individual artisan character
- Finish: Hand-applied patina
Warm Natural-Fired Patina
The natural-fired finish produces amber, bronze, chestnut, and reddish undertones that emphasize the warmth of the copper. Hammer marks and edges may appear lighter or darker depending on how the patina develops.
The finish coordinates especially well with wood, stone, cream cabinetry, black hardware, brass fixtures, and warm neutral walls.
Honey Bronze Patina
A lighter honey-bronze treatment gives the hood a brighter appearance and makes the metallic surface more reflective. It works particularly well in transitional kitchens with white or warm-gray cabinets.
The lighter tone also helps compact kitchens feel more open.
Coffee Brown Finish
A medium coffee patina creates deeper brown coloration while retaining warm copper highlights. This finish is appropriate for Spanish Colonial, rustic, Hacienda, and Mediterranean interiors.
Dark hardware can reinforce the richer color.
Russet and Dark Copper Tones
Darker russet finishes add stronger Old World character. The hammered surface becomes more pronounced because high points and recesses develop greater tonal contrast.
These finishes work especially well with natural wood and stone.
Patina Options
- Honey: Light warm bronze
- Natural Fired: Amber chestnut variation
- Coffee: Medium dark brown
- Russet: Rich reddish-brown tone
- Custom: Subject to available finishes
Copper as a Living Finish
Copper naturally reacts to air, moisture, heat, fingerprints, and kitchen residue. Even a prepared patina may continue evolving with normal use and environmental exposure.
The gradual tonal changes contribute to the authentic appearance of the metal.
Why Patina Variation Is Expected
Hand-applied finishes cannot be reproduced with the exact uniformity of factory paint. Different sections may display slightly different amber, brown, red, or bronze tones.
Lighting can further change the way the finish appears throughout the day.
Transitional Kitchen Design
The clean box profile makes the hood particularly effective in transitional interiors. It introduces handcrafted warmth without requiring the ornate silhouette of a more traditional canopy hood.
White cabinetry, quartz, marble, black fixtures, and warm wood create an ideal surrounding palette.
Pairing with Shaker Cabinets
Shaker-style cabinetry provides simple framed geometry that relates naturally to the hood’s horizontal trim and vertical strap details.
Warm white, taupe, greige, and charcoal finishes all work well with copper.
Pairing with Marble
White or cream marble creates a cool, refined contrast against the warm copper. The stone can be used on countertops or as a backsplash beneath the hood.
A restrained marble pattern keeps attention on the metal enclosure.
Transitional Pairings
- Shaker Cabinets: Clean traditional geometry
- Marble: Refined material contrast
- Quartz: Understated contemporary surface
- Black Hardware: Strong graphic accents
- Wood: Adds organic warmth
Farmhouse Kitchen Applications
Copper naturally complements farmhouse materials such as wood, painted cabinetry, stone, butcher block, and apron-front sinks. The compact under-cabinet design makes it especially useful in practical family kitchens.
The handmade metal adds character without sacrificing upper storage.
Pairing with Butcher Block
Wood countertops repeat the hood’s warm color family while introducing a softer organic texture. Oak, walnut, and reclaimed timber can all coordinate with copper.
White cabinets can separate the two materials visually.
Pairing with a Farmhouse Sink
An apron-front sink creates another strong traditional element at countertop level. Copper, fireclay, or stone sinks can all work depending on the desired level of material repetition.
The range hood remains the main vertical focal point.
Farmhouse Pairings
- Butcher Block: Warm natural surface
- Farmhouse Sink: Traditional kitchen fixture
- Open Shelves: Relaxed visual character
- Wood Beams: Architectural warmth
- Painted Cabinets: Bright copper contrast
Spanish Colonial Influence
Although the hood uses a compact silhouette, its copper surface, framed apron, and structural straps reference Colonial-era architectural and metalworking details.
The design can therefore integrate naturally with plaster, dark wood, iron, Talavera tile, and terracotta.
Using Talavera Tile Below the Hood
A colorful Talavera backsplash can introduce traditional Mexican pattern beneath the restrained copper enclosure. Cobalt, terracotta, green, yellow, and white all coordinate with warm copper.
A controlled pattern helps preserve the hood’s clean geometry.
Dark Wood Cabinetry
Walnut, espresso, or dark-stained wood creates a richer Colonial atmosphere. The copper becomes part of a layered palette rather than standing in strong contrast.
Pale countertops can keep the room visually balanced.
Colonial Pairings
- Talavera: Traditional Mexican color
- Dark Wood: Old World depth
- Iron: Architectural contrast
- Terracotta: Warm clay character
- Plaster: Soft neutral walls
Contemporary Kitchen Applications
The straight-edged profile allows the hood to function as a handcrafted accent in modern kitchens. Flat cabinetry, pale stone, black-framed windows, and minimalist hardware create an effective background.
The copper introduces warmth without disrupting the clean architectural lines.
Using Copper with White Cabinets
White cabinetry creates maximum contrast and makes the hood’s patina and strap details immediately visible. This approach works particularly well in smaller kitchens because the surrounding cabinetry remains bright.
Warm white generally complements copper better than very blue-toned white.
Using Copper with Gray Cabinets
Gray cabinetry offers a cooler neutral backdrop that allows amber and chestnut copper tones to appear richer. Brushed nickel or black hardware can complete the transitional look.
Natural wood flooring helps balance the cooler cabinetry.
Contemporary Pairings
- White: Maximum visual contrast
- Gray: Cool neutral backdrop
- Black: Dramatic modern setting
- Quartz: Controlled countertop surface
- Steel: Mixed-metal contrast
Custom Widths
The supplied design describes widths ranging approximately from 24 to 48 inches. This allows the hood to be adapted to compact cooktops as well as larger residential ranges.
The exact width should be coordinated with the cooking surface, cabinets, and selected ventilation insert.
24-Inch Compact Hoods
A smaller hood can work in apartments, guest kitchens, bars, and other limited spaces where every inch of cabinetry matters.
Decorative details may need to be proportionally adjusted at narrower widths.
36-Inch Under-Cabinet Hoods
A 36-inch width offers enough surface area for clearly visible straps and trim while remaining appropriate for many standard residential kitchens.
It provides a balanced compromise between decorative presence and compact installation.
48-Inch Under-Cabinet Hoods
Larger widths create a more substantial focal point and may accommodate broader ventilation inserts. Cabinet framing and structural support should be planned accordingly.
The expanded surface also makes the hammering and patina more visible.
Width Options
- 24 Inches: Compact kitchens
- 30 Inches: Smaller residential ranges
- 36 Inches: Balanced common format
- 42 Inches: Larger cooking areas
- 48 Inches: Broad under-cabinet installation
Fitting Beneath Upper Cabinets
The hood is designed to coordinate with upper cabinetry approximately 12 to 15 inches deep. Cabinet depth, hood depth, cooking surface position, and desired capture area should be reviewed together.
Custom dimensions can help resolve unusual cabinetry conditions.
Flush Under-Cabinet Installation
A flush installation creates a cleaner transition between the copper hood and cabinets above. The hood reads almost like an architectural extension of the cabinetry.
Accurate cabinet and hood dimensions are essential for this appearance.
Decorative Overmantel Installation
The copper hood may also be incorporated beneath a larger wood or architectural overmantel. In this arrangement, the metal becomes one component within a broader decorative surround.
Ventilation access must remain serviceable.
Cabinet Integration
- Depth: Coordinate 12–15 inch cabinets
- Flush: Clean integrated appearance
- Overmantel: Works inside decorative surround
- Clearance: Maintain safe installation height
- Access: Preserve ventilation servicing
Ventilation Insert Options
The hood’s box-style interior can accommodate dedicated ventilation equipment. The supplied description references optional inserts capable of up to approximately 600 CFM.
The final blower should be selected according to the cooking appliance, kitchen layout, ductwork, and intended use.
Straight-Through Duct Path
A relatively simple box enclosure can allow the duct to rise directly through the hood and cabinetry when the kitchen layout permits.
Reducing unnecessary duct turns can support more efficient airflow.
Stainless-Steel Baffle Filters
Baffle filters help capture airborne grease and can be removed for cleaning. The supplied description identifies them as dishwasher safe.
They should remain readily accessible once the hood is installed.
Ventilation Features
- Capacity: Up to approximately 600 CFM
- Insert: Concealed inside hood
- Filters: Stainless-steel baffles
- Ducting: Straight path when possible
- Service: Maintain accessible components
Ducted Installation
A ducted insert exhausts cooking air to the exterior through an appropriately sized duct system. The route should be planned before cabinetry and hood production are finalized.
Duct size should follow the ventilation equipment manufacturer’s requirements.
Ductless Configuration
The supplied content also references an optional charcoal filtration system for recirculating installations when exterior ducting is not possible.
The selected insert must be specifically designed for ductless operation.
Choosing the Correct Ventilation Setup
Cooking intensity, appliance type, kitchen volume, duct length, local requirements, and desired noise level all affect ventilation selection.
The decorative copper enclosure itself does not determine airflow performance.
Ventilation Planning
- Ducted: Exhausts outdoors
- Ductless: Uses compatible recirculation
- Insert: Confirm exact model
- Airflow: Match cooking requirements
- Duct: Plan before cabinet installation
Planning for Quiet Operation
The original description references low-noise operation at normal speeds when compatible blower systems and vibration-control components are used.
Actual sound levels depend on the insert, duct design, airflow, mounting, and installation conditions.
Reducing Vibration
A properly secured hood and blower assembly helps prevent unnecessary rattling. Loose panels, ducts, or mounting points may amplify motor vibration.
The installer should confirm that all components remain stable before completing the surrounding cabinetry.
Custom Hood Depth
Shallow-depth options can help preserve headroom and maintain a compact appearance in kitchens with limited space. Depth must still provide appropriate coverage above the cooking surface.
Range depth and burner location should be considered when finalizing this dimension.
Mounting Height
The hood should be installed at a height appropriate for the selected cooking appliance and ventilation equipment while maintaining comfortable head clearance.
Always follow the applicable appliance, insert, and installation requirements.
Installation Considerations
- Depth: Coordinate with cooktop
- Height: Preserve safe clearance
- Cabinets: Confirm final opening
- Structure: Reinforce attachment points
- Vent: Align duct before installation
Backsplash Pairings
The relatively clean hood profile can work with either quiet or decorative backsplash materials. Marble, stone slab, subway tile, Talavera, relief tile, and plaster all create different relationships with the copper.
The chosen backsplash should coordinate with the patina and cabinet color.
Marble Backsplash
Marble introduces a refined light surface beneath the warm metal. It works particularly well in transitional kitchens where the copper is intended to be the main handcrafted element.
Subtle veining keeps the wall visually calm.
Mexican Talavera Tile
Talavera tile creates a stronger Hacienda or Spanish Colonial identity. Decorative cobalt, terracotta, yellow, and green can all work with natural copper.
Because the hood has a geometric front, patterned tile can add contrast without creating conflicting silhouettes.
Subway Tile
Simple subway tile offers a clean and affordable background that allows the hammered copper to remain prominent. White, cream, charcoal, and muted green are useful options.
Contrasting grout can add additional graphic definition.
Backsplash Choices
- Marble: Refined transitional backdrop
- Talavera: Colorful regional character
- Subway: Clean simple surface
- Relief: Additional artisan texture
- Plaster: Traditional minimalism
Lighting the Copper Hood
Warm lighting can deepen the amber and chestnut tones of the patina, while cooler daylight reveals brighter copper highlights. Directional illumination also emphasizes the subtle hammering.
Lighting should be planned with the cabinet configuration.
Under-Cabinet Lighting
LED strips or puck lights positioned nearby can illuminate the backsplash and lower apron while revealing the depth of the horizontal trim.
Warm-white color temperatures are especially complementary to copper.
Pendant Lighting Nearby
If the kitchen includes an island, nearby pendant lights can repeat black, brass, glass, or copper finishes. They should complement rather than visually compete with the hood.
Lighting Options
- LED Strips: Highlight backsplash
- Puck Lights: Add focused illumination
- Recessed: Keep ceiling visually clean
- Pendants: Support adjacent island
- Daylight: Reveal natural patina changes
Cleaning the Copper Surface
Use a soft cloth dampened with warm water and mild soap for routine cleaning. Remove grease and cooking residue without aggressive rubbing.
Drying the surface afterward helps reduce water spotting.
Avoiding Abrasive Cleaners
Abrasive pads, powders, ammonia-based sprays, strong acids, and harsh chemical cleaners may scratch or alter the patina.
The goal is to preserve the aged finish rather than restore raw bright copper.
Periodic Wax Protection
The supplied care instructions recommend a thin coat of clear beeswax approximately every six to twelve months to help protect the patina.
The exact schedule depends on use and preferred appearance.
Copper Care
- Clean: Mild soap and water
- Cloth: Use soft microfiber
- Dry: Prevent prolonged moisture
- Wax: Apply periodically if desired
- Avoid: Harsh or abrasive products
Cleaning the Baffle Filters
Filters should be removed periodically and cleaned before heavy grease buildup develops. The supplied guidance mentions soaking them in hot soapy water or using the dishwasher when appropriate.
Cleaning frequency should reflect actual cooking use.
Inspecting Mounting Hardware
Periodically check the hood, cabinetry attachment, duct connection, and ventilation components for looseness or vibration.
Any unusual movement should be addressed before continued use.
Supporting Traditional Copper Craft
Handcrafted copper hoods preserve skills associated with forming, hammering, joining, and finishing metal manually. Each finished enclosure reflects several stages of direct artisan involvement.
The resulting product combines a functional appliance with visible handcraft.
Recycled Copper Content
The supplied description identifies recycled copper as part of the material approach. Reusing copper can reduce the demand for newly extracted metal while retaining the material’s useful properties.
Copper itself can also be recycled again at the end of its service life.
Long Service Life
A durable handcrafted enclosure can remain in use through multiple kitchen updates when properly maintained. Patina changes can enhance rather than diminish the material’s appearance over time.
This longevity contributes to its appeal as an architectural fixture rather than a temporary decorative trend.
Made-to-Order Customization
Each hood can be adapted to the project rather than requiring the kitchen to fit one predetermined enclosure. Width, depth, patina, strap arrangement, and ventilation preparation should be confirmed before fabrication.
Custom work is particularly useful when cabinetry dimensions are already fixed.
Patina Samples
Finish samples can help compare lighter honey tones with coffee or darker russet patinas in the actual kitchen lighting.
Samples represent the general color direction, but exact handmade copper tones may still vary.
Custom Strap Placement
Strap spacing can be coordinated with hood width and the desired visual rhythm. Wider enclosures may allow greater separation, while compact versions require tighter spacing.
Final placement should remain symmetrical unless another design is specifically requested.
Customization Options
- Width: Approximately 24–48 inches
- Depth: Adapt to available space
- Patina: Light to dark copper tones
- Straps: Custom placement
- Insert: Coordinate ventilation system
Measurements to Confirm
Before ordering, measure the cooktop width, cabinet opening, cabinet depth, hood mounting height, available hood depth, duct location, and ventilation insert dimensions.
All measurements should correspond to the finished kitchen layout.
Using Your Own Insert
If a separately purchased ventilation insert will be installed, provide the manufacturer, model number, dimensions, duct outlet, and installation specifications before the copper hood is fabricated.
Nominal insert widths should not be treated as exact dimensions.
Structural Cabinet Support
Upper cabinetry and surrounding framing must be capable of supporting the completed copper hood and ventilation equipment. Decorative cabinet panels alone may not provide adequate structural support.
The installer should review attachment points before installation.
Pre-Order Checklist
- Cooktop: Confirm width and depth
- Cabinets: Measure opening and depth
- Height: Establish mounting clearance
- Duct: Confirm route and size
- Insert: Provide exact specifications
Delivery and Handling
The hood should remain protected during delivery and installation because copper can be scratched or dented by sharp tools and hard impacts.
Keep protective packaging until the enclosure has been completely inspected.
Protecting the Patina During Construction
Tile grout, paint, plaster, adhesives, stone chemicals, and construction dust can affect the copper finish. Cover the hood while nearby trades complete their work.
Clean gloves and padded materials should be used when positioning the enclosure.
Understanding Handmade Variation
Minor differences in hammering, dimensions, seams, patina, strap alignment, and surface tone are normal features of individually fabricated copper products.
These details should be distinguished from significant shipping damage or incorrect fabrication.
Why This Hood Stands Apart
The under-cabinet design offers a useful alternative for homeowners who want handcrafted copper without sacrificing upper cabinetry or installing a tall chimney enclosure.
Its box profile, framed apron, vertical straps, and evolving patina allow a relatively compact appliance to carry substantial architectural character.
Ordering and Project Planning
Before ordering, confirm the hood width, cabinet opening, depth, mounting height, patina, strap arrangement, ventilation insert, duct route, backsplash, structural support, and installation schedule.
For custom dimensions, patina options, insert preparation, or cabinet integration, contact Rustica House before completing the surrounding cabinetry and backsplash.
Conclusion
The Under-Cabinet Copper Hood combines handcrafted 16-gauge copper, subtle hammering, architectural horizontal trim, five vertical strap accents, customizable patina, compact proportions, and adaptable ventilation within a design created specifically for kitchens where upper cabinetry remains part of the cooking wall. With widths described from approximately 24 to 48 inches and optional ventilation systems reaching approximately 600 CFM, the hood can be adapted to a range of residential layouts. Thoughtful measurements, appropriate cabinet support, proper ventilation planning, coordinated backsplash materials, careful installation, and gentle copper maintenance allow this compact artisan hood to bring lasting character to transitional, farmhouse, Colonial, Hacienda, Mediterranean, rustic, and contemporary kitchens.