 US Dollar
 Euro
Euro
 Australian Dollar
 Canadian Dollar
 Polish Zloty
 British Pound

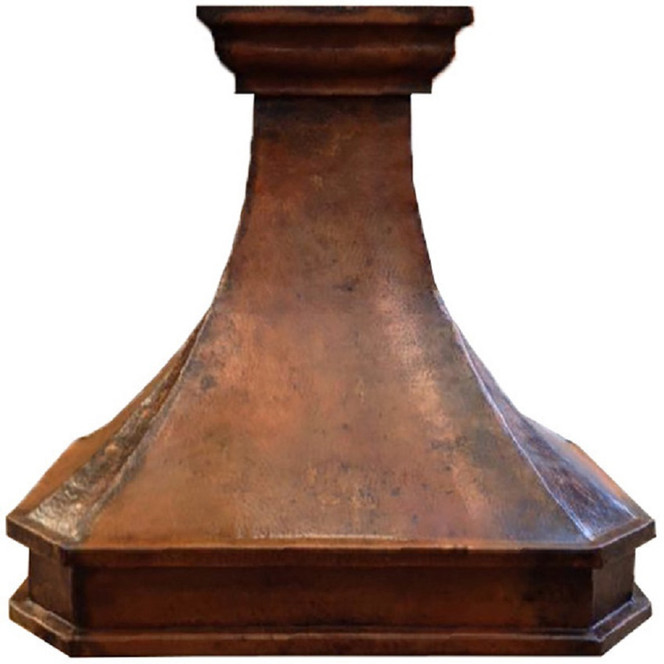
Designer Copper Range Hood: Custom Architectural Vent Hood with Handcrafted Elegance
The Designer Copper Range Hood from Rustica House combines architectural proportion, handcrafted copper, and customizable ventilation in a dramatic centerpiece for distinctive kitchens. Its broad faceted base rises into a gracefully tapered body crowned by oversized stepped molding, creating a sculptural profile inspired by Mediterranean and traditional architectural forms. Hand-hammered from 16-gauge copper, the hood gains additional dimension through subtle surface variation, horizontal architectural bands, and vertical trim accents. Available in custom widths, patinas, mounting styles, and ventilation configurations, this made-to-order hood can complement Mediterranean, Spanish Colonial, rustic, traditional, transitional, and high-ceiling kitchens while becoming the defining feature of the cooking wall.
Blog Summary
- Product: Designer copper range hood
- Material: 16-gauge hammered copper
- Profile: Faceted tapered body
- Widths: 30–96 inches
- Installation: Wall or island mount
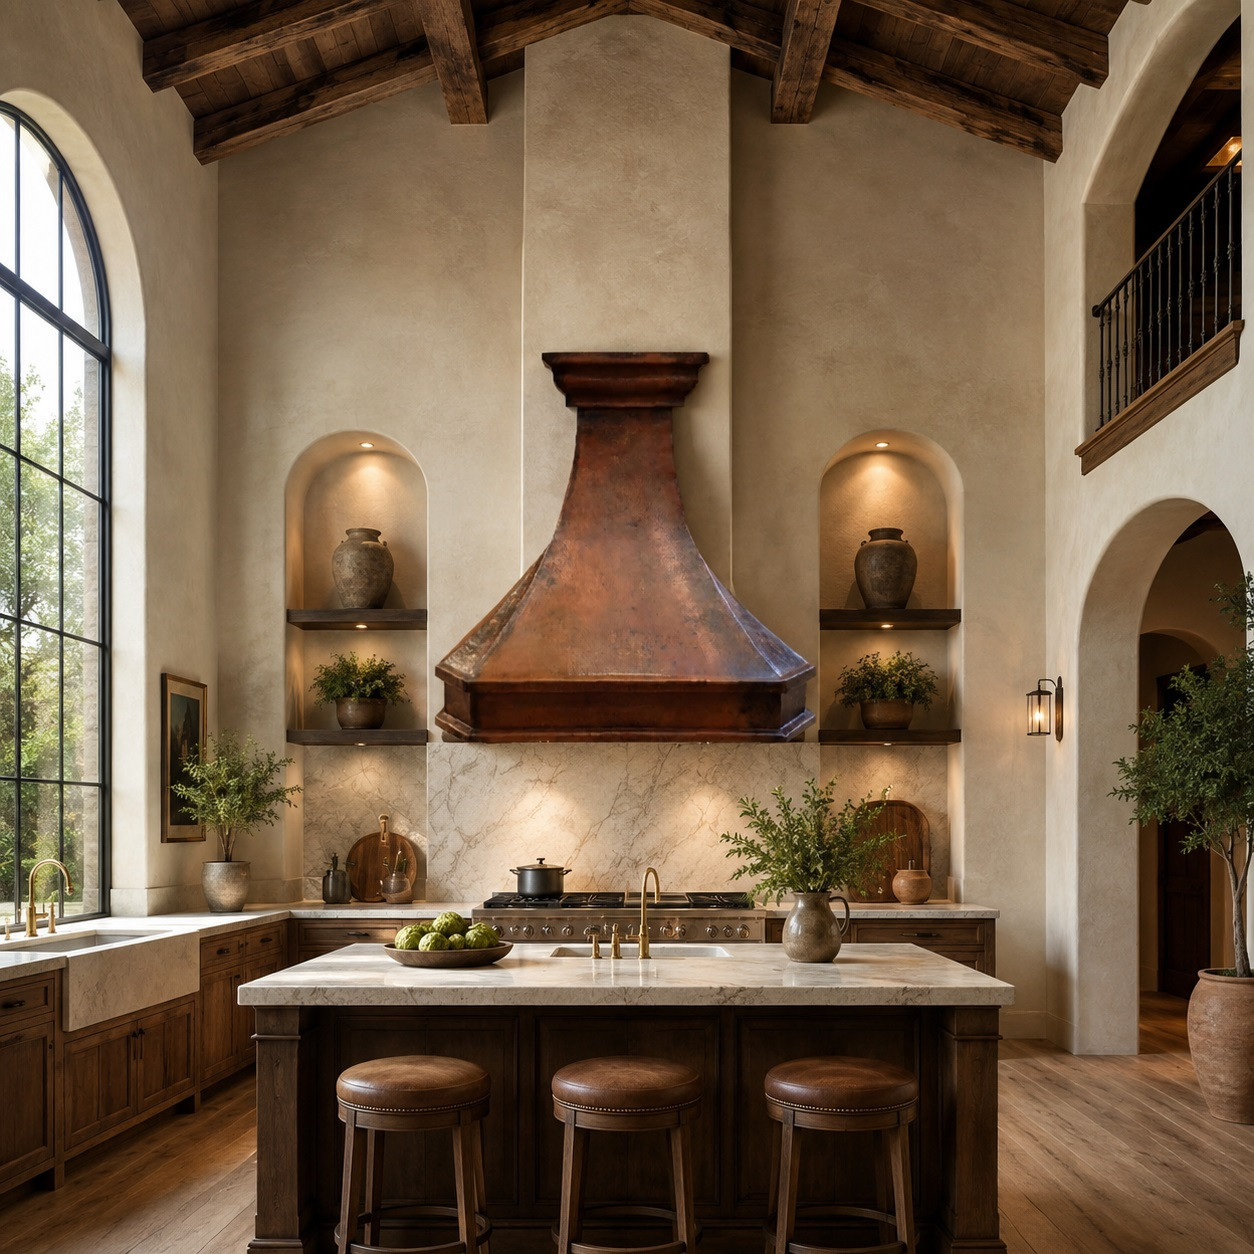
Architectural Presence for the Cooking Wall
This hood is designed to function as more than a ventilation enclosure. Its proportions, stepped molding, faceted lower body, and vertical detailing allow it to behave almost like a piece of built-in architecture above the range.
The broad base creates visual weight at cooking level while the narrower upper section draws attention toward the ceiling.
A Sculptural Alternative to Standard Hoods
Conventional range hoods often rely on simple rectangular or bell-shaped forms. This design introduces multiple planes and transitions that create a more substantial and formal appearance.
The result is particularly effective in kitchens where the hood is intended to become the room’s primary focal point.
Architectural Characteristics
- Base: Wide faceted lower section
- Body: Gradual upward taper
- Crown: Oversized stepped molding
- Trim: Horizontal and vertical accents
- Effect: Strong sculptural presence
Faceted Lower Body
The lower portion is composed of angled planes rather than one continuous curved surface. These facets create clean transitions that catch light differently across the front and sides.
The geometry gives the hood a refined architectural appearance while preserving the warmth associated with handmade copper.
Why Faceted Copper Feels More Architectural
Each plane creates a defined highlight and shadow line, making the silhouette appear more structured. This is particularly visible in kitchens with directional lighting or large windows.
The faceted construction also relates naturally to paneled cabinetry, stone moldings, and other geometric architectural details.
Wide Lower Capture Area
The generous lower section creates a substantial visual frame above the cooking surface. The final dimensions should be coordinated with the range, surrounding cabinetry, and ventilation insert.
Custom widths allow the proportions to be adjusted for both residential and larger professional-style cooking areas.
Faceted Base Benefits
- Geometry: Creates defined surface planes
- Light: Produces changing highlights
- Scale: Grounds the range wall
- Detail: Supports architectural styling
- Customization: Adaptable to wider ranges
Oversized Crown Molding
The upper crown is one of the defining features of the design. Its layered profile creates a strong horizontal termination at the top while adding visual weight near the ceiling.
The molding recalls traditional cornices and classical architectural trim without requiring carved wood or stone.
Stepped Architectural Layers
Multiple horizontal levels create depth across the crown. Each step casts its own shadow, allowing the top of the hood to remain visually interesting even when installed high above the range.
The same stepped language is repeated near the lower apron to create continuity from top to bottom.
Coordinating with Cabinet Moldings
The crown can work especially well in kitchens containing paneled cabinetry or substantial cabinet molding. The profiles do not need to match exactly, but related horizontal lines can make the cooking wall feel cohesive.
In contemporary kitchens, the ornate crown can instead become a deliberate contrast against simpler cabinetry.
Crown Details
- Scale: Oversized architectural molding
- Profile: Multi-level stepped design
- Shadow: Strong horizontal definition
- Placement: Completes upper silhouette
- Style: Traditional and transitional appeal
Hand-Hammered 16-Gauge Copper
The hood is handcrafted from 16-gauge copper and finished with a subtle hammered texture. Thousands of small surface impressions create natural variation without disrupting the clean architectural geometry.
The texture adds depth to the broad metal planes and makes the surface react continuously to changing light.
Why Hand Hammering Matters
Flat sheet metal tends to reflect light evenly, while hammered copper breaks reflections into smaller highlights and shadows. This makes the hood appear warmer and more dimensional.
The craftsmanship is especially visible across the larger uninterrupted areas of the sloping body.
Individual Artisan Variation
Minor differences in hammer marks, patina, seams, dimensions, trim placement, and tonal distribution are expected in handmade production.
These details distinguish a handcrafted enclosure from a mass-produced metal appliance.
Hammered Copper Qualities
- Gauge: 16-gauge copper
- Texture: Hand-hammered surface
- Reflection: Dynamic light response
- Variation: Unique artisan character
- Finish: Enhanced by patina
Honey-Bronze Patina
A honey-bronze finish gives the copper a relatively light and warm appearance, emphasizing amber and golden undertones while keeping the metal visibly bright.
This option works particularly well with cream cabinetry, natural oak, limestone, and warm-white interiors.
Amber-Russet Finish
Amber-russet tones introduce deeper red and brown coloration while retaining warm metallic highlights. The result feels more traditional and aged.
This palette coordinates naturally with Spanish Colonial, Mediterranean, and rustic kitchens.
Deep Coffee Patina
A coffee-brown finish creates a darker, more dramatic hood. The hammered surface becomes more pronounced because raised areas may retain warmer highlights while recessed areas appear deeper.
The finish pairs well with stone, dark wood, black iron, and warm neutral walls.
Patina Options
- Honey Bronze: Light warm finish
- Amber Russet: Reddish aged tone
- Deep Coffee: Dark brown character
- Custom Blend: Project-specific color direction
- Variation: Natural handmade differences
Copper as a Living Material
Copper naturally responds to air, humidity, heat, cooking residue, cleaning, and handling. Even a prepared patina may gradually shift in tone over time.
These changes contribute to the material’s evolving character and should not be expected to remain perfectly uniform.
Horizontal Architectural Accents
Strong horizontal bands appear at the crown and apron, visually dividing the hood into architectural sections. These lines emphasize width and create crisp shadow breaks across the surface.
The repeated horizontal geometry balances the upward taper of the central body.
Vertical Trim Elements
Vertical accents flank the front face and guide the eye upward toward the crown. Their linear placement reinforces the height of the enclosure while giving the broad front additional structure.
These elements may be finished in complementary bronze, matte black, or aged iron tones according to the selected configuration.
Balancing Horizontal and Vertical Lines
Horizontal elements make the hood feel substantial and grounded, while vertical accents create height. Using both directions prevents the large enclosure from appearing either excessively wide or overly tall.
Trim Characteristics
- Horizontal: Crown and apron steps
- Vertical: Front trim elements
- Contrast: Optional darker finish
- Shadow: Adds architectural depth
- Balance: Controls visual proportions
Bronze Trim Accents
Bronze-toned trim keeps the metal palette warm and relatively subtle. It provides enough variation to define the architectural details without creating the stronger contrast of black.
This works particularly well in Mediterranean and traditional interiors.
Matte-Black Trim
Black trim creates a more graphic appearance and clearly outlines the copper planes. It can be repeated through cabinet hardware, windows, faucets, chandeliers, or other architectural metalwork.
The combination is effective in both Spanish Colonial and transitional kitchens.
Aged Iron Details
Aged iron introduces irregular dark brown and black tones that reinforce the handcrafted appearance. It works naturally beside stone, reclaimed wood, plaster, and darker copper patinas.
Trim Finish Options
- Bronze: Warm subtle contrast
- Matte Black: Strong graphic definition
- Aged Iron: Rustic Old World character
- Rivets: Coordinated decorative accents
- Custom: Selected with overall palette
Custom Widths from 30 to 96 Inches
The hood can be produced in widths ranging from approximately 30 to 96 inches, allowing the design to serve compact residential ranges as well as expansive professional cooking installations.
The scale of the crown, facets, trim, and apron should be adjusted proportionally as the overall width changes.
30- and 36-Inch Kitchens
At smaller widths, the design retains its architectural character while occupying less wall space. Trim details must remain proportionate so the enclosure does not feel visually crowded.
These sizes work well in medium residential kitchens where the hood is still intended to make a statement.
48- to 60-Inch Hoods
Mid-size and larger formats provide additional surface area for hammering, faceted planes, and decorative trim. They can balance broader professional-style cooking surfaces and substantial cabinetry.
Ventilation equipment should be selected according to the larger cooking area.
Oversized 72- to 96-Inch Hoods
Very wide custom hoods become architectural installations in their own right. Structural reinforcement, internal framing, insert configuration, freight dimensions, and installation access become increasingly important.
The room should have enough scale to visually support the expanded enclosure.
Width Planning
- 30–36 Inches: Standard residential scale
- 42–48 Inches: Larger home kitchens
- 54–60 Inches: Professional-style installations
- 72–96 Inches: Oversized custom projects
- Proportion: Adjust decorative details accordingly
Ventilation Insert Compatibility
The supplied specifications describe compatibility with blower inserts ranging from approximately 600 to 1,200 CFM. The selected ventilation equipment is installed within the handcrafted copper enclosure.
The exact airflow requirement depends on the cooking appliance, cooking habits, kitchen volume, duct configuration, and applicable requirements.
600 CFM Applications
A 600 CFM insert may suit many residential kitchens depending on the appliance and duct design. The final system should always be selected according to the ventilation manufacturer’s specifications.
Correct duct sizing helps preserve airflow performance.
Higher-Capacity 1,200 CFM Inserts
Larger ranges or more intensive cooking may call for higher-capacity ventilation. The hood can be prepared for inserts reaching approximately 1,200 CFM according to the supplied specifications.
Exact insert dimensions should be provided before fabrication begins.
Ventilation Features
- Capacity: Approximately 600–1,200 CFM
- Insert: Concealed within copper enclosure
- Ducting: Coordinate with blower requirements
- Filters: Stainless-steel baffles
- Customization: Prepare interior for selected equipment
Stainless-Steel Baffle Filters
Baffle filters capture airborne grease while allowing exhaust air to move efficiently through the ventilation system. Stainless steel provides durable construction suitable for regular kitchen use.
The supplied information describes the filters as dishwasher safe.
Optional LED Downlights
Integrated LED lighting can illuminate the cooktop directly beneath the hood. Downlights are especially useful beneath deep or wide custom enclosures where general kitchen lighting may not reach the cooking surface adequately.
The lighting temperature should coordinate with the copper patina and surrounding room.
Control Options
The supplied design includes the possibility of touchpad or rocker-style controls depending on the ventilation configuration.
The selected control system should remain accessible while preserving the decorative appearance of the apron.
Functional Options
- Filters: Stainless-steel baffles
- Lighting: Optional LED downlights
- Controls: Touchpad or rocker options
- Insert: Multiple blower capacities
- Access: Maintain serviceability
Planning for Quiet Ventilation
The original design references insulated housings and vibration-dampening components intended to reduce operational noise. Actual sound levels depend on the blower, airflow, ducting, mounting, and installation.
Properly sized ductwork and secure mounting can help minimize unnecessary vibration.
Wall-Mounted Installation
In a wall-mounted configuration, the hood sits above a cooking surface positioned against the wall. The decorative front and side panels remain visible while the back integrates with the backsplash.
This configuration emphasizes the crown and faceted front profile.
Coordinating Wall Cabinets
Adjacent cabinets should be positioned with enough clearance to reveal the sloped sides of the hood. Crowding the enclosure can reduce the effect of its architectural silhouette.
Cabinet height, crown molding, and hood trim should be considered together.
Wall-Mount Structural Support
The completed copper enclosure and ventilation equipment require secure attachment to appropriate wall framing or blocking. Decorative wall surfaces alone should not carry the weight.
Structural preparation is easiest before tile, drywall, or plaster is completed.
Wall-Mount Planning
- Centerline: Align with cooking surface
- Cabinets: Preserve side clearance
- Backsplash: Coordinate final layout
- Support: Reinforce wall framing
- Duct: Confirm route before fabrication
Four-Sided Island Version
The designer hood can also be produced as an island model with all sides finished because the enclosure is visible throughout the room.
The ceiling becomes the primary support point, requiring careful structural and duct planning.
Ceiling Plate and Suspension
The supplied configuration references a ceiling plate and suspension system for island installations. These components help create a finished transition between the hood and the ceiling.
The final method should correspond to the project’s structural conditions.
Island Hood Symmetry
Because the enclosure can be viewed from every direction, proportions, trim placement, and finish consistency are especially important. The hood should align precisely with the cooking island below.
Island Considerations
- Finish: Complete four-sided exterior
- Support: Reinforced ceiling structure
- Duct: Route through ceiling
- Alignment: Center over island
- Visibility: Consider all viewing angles
Chimney Heights for 8- to 14-Foot Ceilings
The supplied design describes adjustable chimney sections capable of accommodating ceilings ranging from approximately 8 to 14 feet.
The final chimney height should be calculated according to the hood mounting position and finished ceiling height.
Standard Ceiling Installations
For 8- or 9-foot ceilings, the upper section should remain proportionate so the large crown does not crowd the ceiling plane.
Cabinet molding and hood crown placement should be coordinated carefully.
Tall Ceiling Kitchens
Rooms with 10- to 14-foot ceilings provide more space for the hood’s upper architecture. Extended chimney sections help connect the cooking surface with the larger vertical volume.
The tall configuration makes the hood especially effective as a central architectural feature.
Vaulted and Cathedral Spaces
Extension solutions may be used where the ceiling rises beyond typical dimensions. Sloped ceilings require additional measurement because the ceiling elevation can vary across the hood width.
Final measurements should be confirmed before production.
Ceiling Planning
- 8–9 Feet: Compact upper configuration
- 10–12 Feet: Extended architectural profile
- 13–14 Feet: Tall custom chimney
- Vaulted: Extension solutions available
- Measurements: Confirm finished ceiling conditions
Designer Hood in High-Ceiling Kitchens
High ceilings can make standard appliances feel undersized. The large crown, upward taper, and customizable chimney allow this hood to occupy vertical space more convincingly.
Its faceted geometry becomes particularly noticeable when viewed from across a large kitchen or adjoining great room.
Using the Hood as a Vertical Anchor
The enclosure can visually connect lower cabinetry with upper windows, beams, or vaulted ceiling lines. This prevents the cooking wall from feeling visually disconnected from the architecture above.
Surrounding elements can remain simpler so the hood retains its dominant role.
Mediterranean Kitchen Style
The stepped crown, warm copper, substantial scale, and architectural geometry coordinate naturally with Mediterranean materials such as plaster, limestone, travertine, terracotta, dark wood, and aged metal.
The hood can become the formal centerpiece within an otherwise relaxed material palette.
Pairing with Limestone
Limestone offers a soft matte surface that contrasts with the reflective copper. Cream and warm beige stone work especially well with honey and amber patinas.
The material can be used on floors, countertops, or backsplashes.
Pairing with Dark Wood
Walnut or dark-stained cabinetry adds depth and reinforces the Old World quality of the hood. Lighter stone or plaster surfaces can prevent the composition from becoming visually heavy.
Mediterranean Pairings
- Limestone: Warm architectural backdrop
- Travertine: Natural Old World texture
- Terracotta: Earth-tone flooring
- Dark Wood: Traditional visual depth
- Iron: Strong metal contrast
Spanish Colonial Kitchens
Hand-hammered copper works naturally with plaster, Talavera tile, carved wood, terracotta, and forged iron. The hood’s stepped crown reinforces the architectural character of Spanish Colonial interiors.
Darker strap or rivet finishes can connect the hood visually with iron chandeliers and cabinet hardware.
Talavera Backsplash Pairings
Hand-painted Mexican tile can introduce cobalt, green, yellow, terracotta, and white beneath the warm copper. A defined backsplash panel behind the range keeps the pattern concentrated.
Because the hood already has substantial architecture, a controlled tile design generally works best.
Hacienda Kitchen Applications
Large Hacienda interiors often combine handcrafted furniture, stone, copper, iron, clay, and exposed beams. The hood’s generous scale fits comfortably within this layered material approach.
A coffee or amber-russet patina can reinforce the darker traditional palette.
Spanish and Hacienda Pairings
- Talavera: Adds regional color
- Plaster: Soft textured walls
- Iron: Coordinates dark trim
- Wood Beams: Adds architectural scale
- Stone: Grounds the cooking wall
Transitional Kitchen Design
The hood can serve as the primary traditional element in a transitional kitchen containing clean cabinetry, marble or quartz counters, large windows, and restrained hardware.
The faceted geometry keeps the design disciplined while the hammered copper adds handmade warmth.
Pairing with White Cabinets
White or warm-cream cabinetry creates strong contrast and allows the copper silhouette to stand out clearly. The lighter room also prevents a large hood from feeling overly heavy.
Black or bronze hardware can repeat the trim color.
Pairing with Gray Cabinetry
Gray, taupe, or greige cabinetry gives the warm copper a cooler neutral background. Honey-bronze and amber patinas become particularly noticeable against these tones.
Wood flooring helps connect the warm and cool materials.
Transitional Pairings
- White Cabinets: Strong copper contrast
- Gray Cabinets: Cool neutral balance
- Quartz: Clean countertop surface
- Marble: Refined traditional contrast
- Black Hardware: Repeats trim details
Contemporary Applications
Despite its traditional architectural references, the hood can work in modern interiors when the surrounding kitchen is restrained. Flat cabinetry, large-format stone, concrete, and black-framed windows provide a clean background.
The copper becomes a sculptural counterpoint to the simplified room.
Using Mixed Metals
Copper does not need to be the only metal in the kitchen. Brass, bronze, matte black, stainless steel, and aged iron can all be incorporated through hardware, faucets, lighting, and appliances.
Repeating one secondary metal helps unify the composition.
Pairing with a Copper Sink
A copper kitchen sink can repeat the material at countertop level while allowing natural patina variation between the two pieces. Exact color matching is not necessary for handcrafted copper.
The visual repetition creates cohesion without making the kitchen overly coordinated.
Metal Pairings
- Copper: Repeats artisan material
- Brass: Warm golden contrast
- Bronze: Traditional tonal bridge
- Black Iron: Strong architectural definition
- Stainless Steel: Modern appliance contrast
Backsplash Design
The backsplash should be planned as part of the complete range wall because the hood already provides strong geometry and texture. Quiet materials can emphasize the copper, while artisan tile can reinforce a more traditional design.
The backsplash should remain aligned with the hood and range centerline.
Stone Slab Backsplashes
Marble, quartzite, limestone, or another relatively calm stone surface can allow the faceted copper body to remain the dominant element.
Large-format stone also emphasizes the clean architectural scale of the hood.
Relief Tile Applications
High-relief ceramic tile can echo the handcrafted quality of hammered copper. Because both materials create texture, using a limited color palette helps maintain visual balance.
A centered panel behind the cooking surface can provide enough ceramic detail without covering the entire wall.
Talavera Backsplashes
Traditional Talavera introduces more color and pattern. It works particularly well with darker copper finishes and Spanish Colonial interiors.
Simple border treatments can frame the backsplash beneath the architectural hood.
Backsplash Options
- Stone Slab: Quiet architectural surface
- Marble: Refined light backdrop
- Relief Tile: Sculptural artisan texture
- Talavera: Colorful traditional accent
- Plaster: Minimal Old World background
Lighting the Hammered Copper
Lighting strongly influences how copper patina and hammering are perceived. Warm light deepens amber and coffee tones, while daylight may reveal brighter reddish and metallic highlights.
The faceted planes make this interaction especially visible.
Integrated Downlights
Optional lights beneath the hood can illuminate the cooking surface without requiring additional fixtures directly above the range.
They also create a pool of light beneath the darker apron.
Directional Ceiling Lighting
Recessed fixtures aimed toward the front and sides can highlight the texture, trim, and crown without adding another prominent decorative object near the hood.
Avoid excessive glare on the metal surface.
Lighting Strategies
- Warm LEDs: Enrich patina
- Downlights: Illuminate cooktop
- Recessed: Highlight architectural planes
- Daylight: Reveal tonal variation
- Pendants: Support nearby island areas
Routine Copper Cleaning
Wipe the copper gently with a soft microfiber cloth and mild, pH-neutral soap to remove fingerprints, grease, and ordinary cooking residue.
Avoid aggressive scrubbing, particularly around hammered surfaces and trim details.
Avoid Abrasive Products
Scouring pads, strong acids, ammonia-based cleaners, and harsh chemicals may scratch the copper or alter the patina.
Care should focus on maintaining the intended aged appearance rather than polishing the surface back to bright copper.
Wax and Surface Protection
The supplied care guidance recommends applying a light coat of beeswax or an appropriate copper-care product approximately every six to twelve months.
Any product should be tested for compatibility with the selected patina.
Copper Care
- Clean: Mild soap and water
- Cloth: Soft microfiber
- Dry: Remove excess moisture
- Protect: Wax periodically if desired
- Avoid: Abrasive chemical products
Cleaning Baffle Filters
The supplied maintenance guidance recommends cleaning stainless-steel baffle filters regularly, with approximately monthly cleaning suggested for routine use.
Actual frequency should reflect cooking habits and the insert manufacturer’s recommendations.
Ductless Charcoal Filters
For compatible recirculating configurations, charcoal filters must be replaced periodically. The supplied information suggests approximately every six to twelve months.
Replacement timing will vary according to cooking frequency and filter specifications.
Protecting the Hood During Construction
Keep the copper covered while adjacent cabinetry, tile, stone, grout, plaster, paint, and electrical work are being completed. Construction chemicals and sharp tools can permanently damage the finish.
Use clean gloves and padded materials during final installation.
Made-to-Order Craftsmanship
Each Designer Copper Range Hood is individually fabricated according to the selected dimensions, mount type, patina, trim treatment, and ventilation configuration.
Final specifications should be approved before fabrication begins because later changes may affect fit and proportions.
Measurements to Confirm
Verify the range width and depth, available hood space, cabinet spacing, mounting height, finished ceiling height, duct route, backsplash dimensions, and selected ventilation insert.
Vaulted or cathedral ceilings require additional measurements of the upper architectural conditions.
Using Your Own Ventilation Insert
If the project uses a separately purchased insert, provide the exact manufacturer, model, width, depth, height, duct outlet, and installation requirements before production.
Nominal insert widths should not be treated as precise fabrication dimensions.
Pre-Order Checklist
- Range: Confirm appliance dimensions
- Width: Choose final hood span
- Height: Measure finished ceiling
- Duct: Confirm route and outlet
- Insert: Provide exact specifications
Structural Preparation
Large copper hoods require appropriate wall or ceiling support. Blocking and reinforcement are easiest to install before finished surfaces are completed.
The installer should review the weight of the hood, ventilation equipment, and mounting system.
Delivery and Access Planning
Oversized custom hoods require protective packaging, and the shipping crate may be considerably larger than the finished enclosure. Measure doors, hallways, gates, elevators, and staircases in advance.
Very large hoods may require several people or lifting equipment during installation.
Inspecting the Shipment
Inspect the protective packaging before discarding it. Photograph visible impact or damage and retain the packing until the hood has been completely reviewed.
The copper should be handled carefully to preserve both its form and patina.
Delivery Checklist
- Access: Measure delivery route
- Crate: Inspect before disposal
- Handling: Arrange sufficient assistance
- Protection: Preserve copper surfaces
- Installation: Coordinate with contractor
Understanding Handmade Variation
Handmade copper range hoods can display minor differences in hammering, seams, dimensions, trim alignment, rivets, patina, and tonal distribution.
These characteristics reflect artisan fabrication and should be distinguished from significant structural damage or incorrect dimensions.
Why Choose a Designer Copper Hood?
This hood combines the warmth and individuality of handcrafted copper with an unusually architectural silhouette. The faceted body, oversized molding, strong trim lines, and customizable proportions allow the enclosure to become part of the kitchen design rather than simply another appliance.
Its versatility also allows the same basic form to shift from Mediterranean and Spanish Colonial to transitional and contemporary depending on patina, trim, cabinetry, and surrounding materials.
Ordering and Project Planning
Before ordering, confirm the hood width, mounting style, chimney height, patina, hammered texture, trim finish, ventilation insert, blower capacity, duct route, backsplash, structural support, lighting, and installation schedule.
For custom dimensions, finish options, insert preparation, island configurations, or high-ceiling requirements, contact Rustica House before completing the surrounding cabinetry and construction.
Conclusion
The Designer Copper Range Hood combines handcrafted 16-gauge copper, a faceted tapered body, oversized stepped crown molding, horizontal architectural bands, vertical trim accents, customizable patinas, and adaptable ventilation within a made-to-order centerpiece designed for distinctive kitchens. Available in widths from approximately 30 to 96 inches, compatible with 600 to 1,200 CFM blower inserts, and configurable for wall-mounted or island applications with ceiling heights from approximately 8 to 14 feet, the hood can be tailored to a broad range of residential projects. With thoughtful measurements, proper structural support, coordinated ventilation, careful material pairing, professional installation, and gentle copper maintenance, this designer hood can bring lasting architectural character to Mediterranean, Spanish Colonial, Hacienda, rustic, traditional, transitional, contemporary, and high-ceiling kitchens.