 US Dollar
 Euro
Euro
 Australian Dollar
 Canadian Dollar
 Polish Zloty
 British Pound

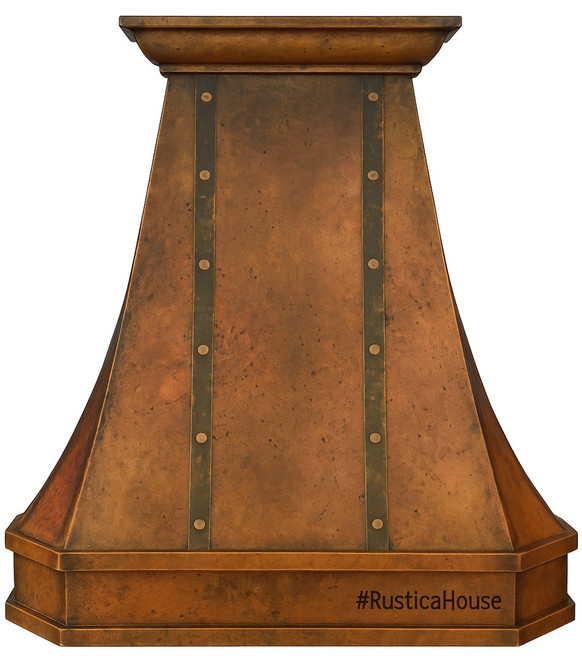
36-Inch Copper Range Hood: Hand-Hammered Artisan Vent Hood for Distinctive Kitchens
A 36-Inch Copper Range Hood combines practical kitchen ventilation with the warmth, texture, and architectural character of handcrafted metalwork. Its gently sloping body, decorative crown molding, contrasting strap details, and hand-hammered copper surface create a focal point that works especially well in Spanish Colonial, Southwestern, Hacienda, rustic, farmhouse, and transitional interiors. Sized for many residential cooking areas, the 36-inch format offers substantial visual presence without overwhelming medium-size kitchens. Each hood is made to order, allowing the finish, strap treatment, chimney height, and ventilation configuration to be coordinated with the surrounding cabinetry and ceiling height.
Blog Summary
- Width: 36 inches
- Material: Hand-hammered copper
- Style: Spanish Colonial and Southwestern
- Ventilation: 200 CFM insert included
- Installation: Wall or island configuration

A Balanced Size for Residential Kitchens
A 36-inch range hood offers a practical balance between visual presence and manageable scale. It can anchor the cooking wall without requiring the oversized proportions associated with larger professional installations.
The format works particularly well in kitchens where the hood is intended to stand out while remaining proportional to surrounding cabinets and countertops.
Why 36 Inches Is a Popular Width
Many residential kitchen layouts are designed around cooking appliances and cabinet openings that make a 36-inch hood a natural architectural choice. The width is substantial enough to support decorative details such as straps, molding, and hammering.
At the same time, it remains compact enough for transitional, farmhouse, and smaller high-ceiling kitchens.
36-Inch Hood Benefits
- Scale: Balanced residential proportion
- Presence: Strong visual focal point
- Detail: Room for decorative accents
- Flexibility: Works with varied layouts
- Customization: Adaptable chimney height
Hand-Hammered Copper Surface
Each hood is hand-hammered by experienced coppersmiths, creating a surface filled with subtle dimples and irregular reflections. The texture changes continuously as natural and artificial light move across the metal.
Because the hammering is completed manually, no two hoods display precisely the same surface pattern.
Why Hammering Adds Depth
A completely smooth metal surface reflects light more uniformly. Hammered copper breaks that reflection into hundreds of smaller highlights and shadows, making the hood feel warmer and more dimensional.
The texture becomes especially visible around the canopy curves, crown, and apron.
Individual Artisan Character
Minor variations in hammering, patina, rivet placement, seams, and dimensional details are expected in handmade production. These characteristics help distinguish an artisan hood from factory-stamped metal appliances.
Photographs should therefore be viewed as a representation of the general design rather than an exact duplicate of every finished piece.
Hammered Copper Qualities
- Texture: Random hand-hammered finish
- Reflection: Dynamic highlights
- Variation: Unique on every hood
- Depth: Enhanced by patina
- Craft: Visible artisan workmanship
Warm Chestnut Copper Patina
The shown finish uses a warm chestnut tone that deepens the natural reddish-brown character of copper. Darker areas settle around hammer marks and seams, while raised portions may reveal warmer metallic highlights.
This variation gives the hood an established, Old World appearance rather than the uniform color of painted metal.
Patina and Light
Natural daylight can reveal amber and copper undertones, while warm evening lighting emphasizes deeper brown and bronze tones. The hood may therefore appear slightly different throughout the day.
Directional lights can be used intentionally to highlight the hammered surface.
Copper as an Evolving Finish
Copper naturally reacts to air, moisture, heat, fingerprints, and normal kitchen use. Even a prepared patina may continue to develop subtle tonal changes over time.
This gradual evolution is part of the character associated with genuine copper.
Patina Characteristics
- Tone: Warm chestnut brown
- Undertones: Natural copper warmth
- Variation: Handmade finish differences
- Aging: May continue naturally
- Lighting: Changes perceived color
Classic Sloping Silhouette
The hood begins with a broad lower body that gently narrows as it rises toward the chimney. This sloping profile creates a familiar architectural shape that works across many traditional and transitional kitchen styles.
The taper also helps the hood feel visually lighter near the ceiling.
Broad Lower Canopy
The widest portion sits near the cooking surface, giving the hood enough visual weight to frame the range beneath it. The broad base also provides room for decorative straps and apron detailing.
Its proportion should be coordinated with cabinet width and backsplash layout.
Tapered Upper Body
As the hood narrows upward, it transitions naturally into the chimney. This movement draws the eye vertically and helps connect the cooking area with taller walls or ceilings.
The shape works especially well in rooms with exposed beams, vaulted ceilings, or generous crown molding.
Silhouette Features
- Base: Broad visual foundation
- Body: Gently sloped sides
- Chimney: Narrow upper section
- Profile: Balanced vertical movement
- Style: Traditional architectural form
Decorative Crown Molding
A stepped molding detail caps the upper portion of the hood, creating a finished transition between the chimney and the ceiling area. The crown adds architectural refinement without overpowering the main copper surface.
Its layered profile recalls traditional cornices and carved architectural trim.
Why Crown Molding Matters
The upper edge of a range hood is highly visible, particularly in kitchens with tall ceilings. A simple unfinished transition may look abrupt, while decorative molding provides a more intentional termination.
The crown also helps coordinate the hood with surrounding cabinetry and architectural trim.
Pairing with Cabinet Crown
If the kitchen cabinets also feature molding, the hood crown should complement rather than duplicate it exactly. Similar proportions or repeated horizontal lines can help connect the two features.
A small amount of contrast can keep the hood visually distinct.
Crown Design Benefits
- Finish: Completes upper silhouette
- Detail: Adds architectural refinement
- Height: Draws attention upward
- Balance: Connects hood and cabinetry
- Style: Supports traditional interiors
Clean-Lined Copper Apron
The lower apron provides a strong horizontal foundation beneath the sloping body. Its restrained form balances the texture above and creates a clear transition into the cooking area.
The apron also provides a natural location for strap and rivet details.
Three Horizontal Strap Accents
Horizontal metal straps introduce linear structure across the front of the hood. They break up the large copper field and emphasize the width of the 36-inch enclosure.
The dark finish provides a deliberate contrast against the warmer copper body.
Two Vertical Straps
Vertical straps reinforce the hood’s upward movement and visually connect the apron with the chimney. Used together with horizontal bands, they create a structured, almost architectural grid.
This combination recalls old metalwork found in doors, gates, chests, and forged architectural details.
Strap Layout
- Horizontal: Three decorative bands
- Vertical: Two front straps
- Finish: Matte black contrast
- Detail: Riveted appearance
- Effect: Structured Old World character
Matte Black Strap Contrast
Dark straps provide a strong graphic outline against the chestnut copper. The contrast emphasizes the hood shape and prevents the broad hammered surface from appearing visually flat.
Black also coordinates easily with cabinet hardware, iron lighting, windows, and other architectural metalwork.
Riveted Spanish Colonial Detail
Rivets reinforce the hand-forged appearance of the strap system. Their repeated placement adds texture and rhythm while referencing traditional Spanish Colonial and Southwestern metalwork.
The small decorative elements are especially visible when side lighting catches their edges.
Spanish Colonial Influence
The combination of warm copper, black metal straps, rivets, tapered form, and architectural molding connects naturally with Spanish Colonial kitchens.
Plaster walls, carved wood cabinetry, Talavera tile, terracotta, wrought iron, and stone provide complementary materials.
Spanish Colonial Pairings
- Talavera Tile: Adds handcrafted color
- Dark Wood: Reinforces historic warmth
- Iron: Repeats black strap details
- Plaster: Provides soft neutral backdrop
- Terracotta: Echoes warm copper tones
Southwestern Kitchen Character
The hood’s hammered copper, dark bands, rivets, and strong geometric form also fit naturally within Southwestern interiors. Earth tones and tactile materials reinforce the handcrafted appearance.
The warm metal works particularly well with stone, wood, clay tile, and desert-inspired neutral colors.
Pairing with Natural Stone
Limestone, sandstone, travertine, and other warm stones provide a quieter matte surface beside reflective copper. The contrast between stone and hammered metal makes both materials more noticeable.
Simple stone backsplashes can prevent the range wall from becoming overly decorative.
Pairing with Wood Beams
Exposed beams help balance the visual weight of a copper hood, especially in kitchens with high ceilings. Dark timber creates a traditional atmosphere, while lighter wood supports a more relaxed Southwestern or farmhouse interpretation.
The hood and beams together create a layered architectural ceiling line.
Southwestern Materials
- Stone: Natural architectural texture
- Wood: Warm organic contrast
- Clay Tile: Regional earth tones
- Iron: Strong graphic accents
- Plaster: Soft handcrafted walls
Wall-Mounted Installation
In a wall-mounted configuration, the hood sits above a range positioned against the kitchen wall. The back remains visually integrated with the backsplash while the decorative front and sides remain visible.
This is one of the most common applications for a 36-inch hood.
Planning the Range Wall
Cabinet openings, backsplash width, crown molding, duct location, and range centerline should all be coordinated before production. Small alignment differences become noticeable around a highly decorative hood.
The hood should appear intentionally centered within the complete wall composition.
Wall-Mount Visual Balance
Leaving appropriate space between the hood and adjoining cabinets helps the metal silhouette remain visible. Crowding the enclosure may hide the sloped sides and reduce its architectural presence.
Wall-Mount Considerations
- Centerline: Align with cooking surface
- Cabinets: Preserve visual clearance
- Backsplash: Coordinate final layout
- Duct: Plan before fabrication
- Support: Reinforce mounting structure
Island-Mount Configuration
The source design also allows an island configuration, where all four sides of the hood become visible. Island hoods require additional attention to symmetry, ceiling support, duct location, and finish consistency.
The extended visibility makes hand-hammered texture particularly important.
Four-Sided Presentation
Unlike a wall hood, an island installation can be viewed from dining areas, living spaces, and several points throughout the kitchen. Decorative bands and seams therefore need to read coherently around the entire enclosure.
A central cooking island can turn the hood into the primary architectural feature of an open floor plan.
Structural Ceiling Support
An island hood cannot rely on wall framing for support, so ceiling structure must be prepared appropriately. Blocking and reinforcement should be installed before finishing the ceiling whenever possible.
The final weight and mounting method should be reviewed with the installer.
Island Installation Planning
- Visibility: Finished on all sides
- Support: Reinforced ceiling attachment
- Ducting: Coordinate through ceiling
- Centering: Align with kitchen island
- Lighting: Preserve clear sightlines
Adjustable Chimney Height
The supplied design describes adjustable chimney sections suitable for ceiling heights ranging from approximately 8 to 12 feet. This flexibility allows the hood to work in conventional kitchens as well as taller spaces.
The final chimney height should be confirmed according to the finished ceiling and required mounting position.
Eight-Foot Ceilings
With a standard ceiling height, the hood should remain proportionate and avoid an excessively tall chimney. Cabinet crown and ceiling transitions become especially important because there is less open wall space above the enclosure.
The tapered profile helps keep the overall design balanced.
Twelve-Foot Ceilings
Taller rooms provide more opportunity for an extended chimney and architectural crown. The hood can occupy additional vertical space without feeling oversized.
Lighting and upper cabinetry should be planned so they do not compete with the hood.
Ceiling Height Options
- Minimum: Approximately 8 feet
- Maximum: Approximately 12 feet
- Chimney: Adjustable by project
- Crown: Completes ceiling transition
- Proportion: Coordinate with room height
High-Ceiling Kitchen Applications
A 36-inch hood can still create strong architectural impact in a high-ceiling kitchen when the chimney is extended appropriately. The combination of copper texture and vertical strapping prevents the enclosure from disappearing within the taller room.
Surrounding cabinets do not necessarily need to extend to the ceiling when the hood provides sufficient vertical presence.
Using the Hood as a Vertical Anchor
The range hood can connect the lower cooking zone with upper windows, beams, or architectural trim. Its narrowing silhouette naturally draws the eye upward.
This effect is especially useful in rooms where the ceiling feels visually disconnected from the cabinetry.
Balancing Tall Windows
When tall windows flank the range wall, the copper hood can serve as the central solid form between them. Warm metal provides contrast against daylight and glass.
The hood’s width should remain proportionate to the windows and cooking surface.
High-Ceiling Design Strategies
- Chimney: Extend vertical presence
- Straps: Reinforce upward movement
- Windows: Balance surrounding height
- Cabinets: Maintain visual proportion
- Lighting: Highlight hammered texture
200 CFM Blower Insert
The supplied product information includes a 200 CFM blower insert intended for everyday residential cooking. The insert provides the mechanical ventilation while the copper hood forms the decorative enclosure.
Actual ventilation requirements depend on the cooking appliance, room, ductwork, cooking habits, and applicable installation standards.
Understanding CFM
CFM measures the volume of air moved by the ventilation system. Higher-output cooking appliances or frequent high-heat cooking may require greater airflow than occasional residential use.
The ventilation configuration should be reviewed before finalizing the hood.
Removable Baffle Filters
Stainless-steel baffle filters collect airborne grease while allowing exhaust air to move through the insert. Removable filters simplify periodic cleaning.
The supplied description identifies them as dishwasher safe.
Ventilation Features
- Blower: 200 CFM included
- Filters: Stainless-steel baffles
- Access: Removable for cleaning
- Operation: Intended for everyday use
- Customization: Blower options available
Quiet Everyday Operation
The hood is described as operating quietly at normal ventilation speeds. Noise remains influenced by blower design, duct dimensions, duct length, elbows, installation quality, and airflow resistance.
A properly planned duct system can help the ventilation equipment perform more efficiently.
Ductwork Planning
Before fabrication, determine the duct size, outlet position, route, exterior termination, and any structural obstacles. Reducing unnecessary bends can help preserve airflow.
The duct should align with the selected insert and applicable building requirements.
Custom Ventilation Configurations
Because the hood is made to order, blower capacity may be discussed before production. The internal structure can then be coordinated with the selected ventilation equipment.
Exact insert specifications should be supplied when using equipment other than the standard configuration.
Ventilation Planning
- Insert: Confirm before fabrication
- Duct Size: Match equipment requirements
- Route: Minimize unnecessary turns
- Access: Preserve serviceability
- Installer: Coordinate ventilation system
Pairing with a Copper Kitchen Sink
A copper sink can repeat the range hood material elsewhere in the kitchen without requiring the finishes to match exactly. Natural variation between copper pieces often makes the room feel more layered and authentic.
A darker sink can balance a lighter hood or vice versa.
Pairing with Brass Fixtures
Brass faucets and hardware introduce another warm metal while keeping the kitchen from feeling overly matched. Antique or unlacquered brass works particularly well with chestnut copper.
Black straps provide enough contrast to unify mixed metals.
Pairing with Black Hardware
Black cabinet pulls, windows, lighting, and plumbing details can repeat the matte strap finish. This creates continuity across the kitchen and emphasizes the graphic geometry of the hood.
Metal Pairings
- Copper: Warm coordinated material
- Brass: Adds golden contrast
- Iron: Repeats strap details
- Bronze: Supports traditional interiors
- Stainless: Creates transitional contrast
Kitchen Backsplash Options
The backsplash can either remain quiet beneath the hood or introduce additional artisan decoration. Stone slab, simple ceramic, Talavera tile, and relief tile all create different relationships with hammered copper.
The level of ornament should be balanced against the straps and crown molding.
Natural Stone Backsplashes
Limestone, marble, travertine, and other stone materials provide a calmer visual background. Their relatively subtle pattern allows the hammered copper to remain dominant.
Stone also reinforces the substantial architectural character of the cooking wall.
Talavera Tile Backsplashes
Hand-painted Mexican tile can create a stronger Spanish Colonial or Hacienda atmosphere. Cobalt, terracotta, yellow, green, and white all coordinate with warm copper.
A defined panel directly behind the range can provide color without overwhelming the surrounding wall.
Relief Tile Backsplashes
Sculpted relief tile introduces texture that echoes the handcrafted hammering of the hood. Because both surfaces are dimensional, use a controlled palette to avoid excessive visual competition.
Backsplash Choices
- Stone: Quiet architectural backdrop
- Talavera: Colorful Mexican character
- Relief Tile: Sculptural artisan texture
- Subway Tile: Transitional simplicity
- Plaster: Soft Old World surface
Farmhouse Kitchen Design
The sloping copper body also works well in farmhouse kitchens where warm metals soften white cabinetry, open shelving, wood beams, and apron-front sinks.
The dark straps provide enough contrast to keep the design from feeling overly traditional.
White Cabinet Pairings
White and warm-cream cabinetry make the copper hood stand out clearly. The brighter surroundings reveal the chestnut patina and hammered texture more dramatically.
Natural wood can then be introduced through floors, shelves, or ceiling beams.
Natural Wood Kitchens
Oak, walnut, and reclaimed timber reinforce the warm tones of copper. Darker wood produces a richer Old World appearance, while lighter oak creates a more casual transitional result.
Stone or pale counters can keep the palette balanced.
Farmhouse Pairings
- White Cabinets: Strong metal contrast
- Oak: Relaxed warmth
- Farmhouse Sink: Traditional focal fixture
- Stone Counters: Natural neutral surface
- Wood Beams: Architectural connection
Transitional Kitchen Applications
In a transitional kitchen, the handcrafted hood can become the traditional element within an otherwise cleaner composition. Simple cabinetry, quartz, marble, restrained hardware, and large windows create an effective background.
The copper supplies warmth while the black straps add contemporary definition.
Modern Contrast
Although rooted in traditional metalwork, the hood can work in contemporary spaces when the remaining materials stay controlled. Flat cabinetry, concrete, stone, glass, and black steel can emphasize the copper as a sculptural object.
Minimal decoration around the range prevents competing focal points.
Using Copper with Dark Cabinetry
Charcoal, navy, dark green, black, and walnut cabinetry create a sophisticated background for warm copper. Adequate lighting becomes important to prevent the range wall from feeling too heavy.
Pale counters or backsplashes can restore visual balance.
Transitional Pairings
- Quartz: Clean understated surface
- Marble: Refined material contrast
- Black Frames: Repeat strap color
- Flat Cabinets: Highlight hood shape
- Neutral Walls: Preserve visual balance
Lighting the Hood
Lighting can dramatically change the appearance of hammered copper. Warm artificial light deepens the chestnut finish, while daylight reveals brighter red and amber undertones.
Directional recessed lighting can emphasize the hammered texture and decorative molding.
Under-Cabinet Lighting
If adjacent cabinets include under-cabinet lights, their glow can help illuminate the backsplash and lower apron. This creates a layered effect beneath the darker copper body.
The lighting temperature should coordinate with the room’s other fixtures.
High-Ceiling Pendant Lights
In open kitchens, island pendants should be positioned so they do not visually obstruct the range hood. Simple glass, iron, brass, or restrained metal fixtures work well.
The hood should remain the dominant feature on the cooking wall.
Lighting Strategies
- Warm LEDs: Enhance chestnut patina
- Recessed Lights: Reveal hammer texture
- Daylight: Shows natural color variation
- Under-Cabinet: Illuminates apron and backsplash
- Pendants: Support nearby zones
Routine Copper Cleaning
Use a soft cloth and mild soap to remove ordinary kitchen residue. Wipe gently rather than aggressively rubbing the finish.
Drying the surface afterward can help reduce mineral spots and streaks.
Avoid Abrasive Products
Scouring pads, abrasive powders, aggressive acids, and harsh chemicals can scratch copper or change the patina. Cleaning should preserve the intended aged finish rather than expose bright raw metal.
Always test unfamiliar products in an inconspicuous area.
Wax Protection
The source guidance recommends applying a light beeswax coating approximately every six to twelve months to help preserve the finish. Actual frequency depends on use, environment, and preferred appearance.
Only products compatible with patinated copper should be used.
Copper Care
- Clean: Mild soap and water
- Cloth: Use soft microfiber
- Dry: Remove excess moisture
- Wax: Apply periodically if desired
- Avoid: Abrasive cleaning products
Cleaning the Baffle Filters
Removable stainless-steel baffle filters should be cleaned regularly so grease does not accumulate. The supplied information describes the filters as dishwasher safe.
Cleaning frequency depends on how often and how heavily the range is used.
Protecting Copper During Construction
The hood should remain covered while contractors install tile, grout, countertops, paint, plaster, lighting, and cabinetry nearby. Sharp tools and construction chemicals can permanently affect the patina.
Clean gloves and padded surfaces should be used during handling.
Made-to-Order Production
Each 36-inch hood is produced according to the selected configuration rather than being pulled from standard finished inventory. This allows the patina, strap treatment, chimney height, and ventilation setup to be coordinated with the kitchen.
Final choices should be confirmed before fabrication begins.
Patina Customization
Different copper tones can substantially alter the appearance of the same hood design. Lighter natural finishes emphasize metallic brightness, while dark coffee or chestnut tones create a more traditional atmosphere.
Hand-applied patinas will show natural variation.
Strap Customization
The contrasting straps may be coordinated with cabinet hardware, windows, lighting, faucets, or other metal elements. Dark finishes provide the strongest contrast against copper.
The exact visual effect should be selected according to the complete kitchen palette.
Customizable Elements
- Patina: Select preferred copper tone
- Straps: Coordinate contrasting finish
- Chimney: Adapt to ceiling height
- Mount: Wall or island configuration
- Blower: Review desired capacity
Measurements to Confirm Before Ordering
Verify the cooking appliance width, available wall opening, hood mounting height, ceiling height, cabinet spacing, backsplash dimensions, duct location, and required chimney length.
For island installations, also confirm ceiling structure and the exact centerline of the cooking surface.
Coordinating the Insert
If a different ventilation insert is selected, provide the exact manufacturer and model specifications before the hood is fabricated. The internal support and opening must match the insert dimensions.
Do not assume inserts with similar nominal widths have identical physical measurements.
Structural Preparation
Wall and ceiling framing should be capable of supporting the finished hood. New construction provides the easiest opportunity to install blocking before drywall, plaster, or tile is completed.
The contractor should confirm the final support method.
Pre-Order Checklist
- Width: Confirm 36-inch configuration
- Height: Measure finished ceiling
- Mounting: Establish installation height
- Duct: Confirm outlet position
- Insert: Provide exact specifications
Delivery and Handling
Handcrafted copper hoods require protective packaging to preserve the patina and prevent deformation. Review the route from delivery point to kitchen before the hood arrives.
Doorways, hallways, staircases, islands, and other obstacles should provide adequate clearance.
Inspecting the Shipment
Inspect the packaging for visible damage before discarding any materials. Photograph dents, crushed areas, or other signs of freight impact if present.
Keep the protective crate until the hood has been inspected fully.
Safe Handling
Use adequate help when lifting and positioning the hood. Avoid carrying the complete weight by straps, trim, crown molding, or other decorative components.
Padded protection helps prevent scratches and patina damage during installation.
Delivery Checklist
- Route: Confirm access to kitchen
- Packaging: Inspect before disposal
- Photos: Document visible damage
- Handling: Arrange sufficient assistance
- Protection: Preserve copper finish
Understanding Handmade Variation
Hand-hammered copper hoods naturally show slight differences in dimensions, patina, hammering, strap alignment, rivet placement, seams, and tonal distribution.
These features are part of the artisanal character and should be distinguished from major structural damage or incorrect fabrication.
Why a Handmade Hood Stands Apart
Factory hoods are generally produced with stamped surfaces and standardized finishes. A handcrafted copper hood displays visible evidence of forming, hammering, finishing, and assembly completed individually.
This difference becomes particularly noticeable when the hood is used as the primary focal point of the kitchen.
Ordering and Project Planning
Before ordering, confirm the 36-inch width, mounting style, chimney height, ceiling height, chestnut patina, strap finish, blower configuration, duct route, backsplash design, cabinet spacing, structural support, and installation schedule.
For custom patina, strap, chimney, or ventilation requirements, contact Rustica House before completing the surrounding cabinetry and construction.
Conclusion
The 36-Inch Copper Range Hood combines a hand-hammered copper surface, warm chestnut patina, classic sloping silhouette, decorative crown molding, structured apron, matte-black horizontal and vertical straps, riveted accents, and made-to-order construction in a versatile architectural centerpiece. Designed for wall-mounted or island installations and adaptable to ceiling heights from approximately 8 to 12 feet, the hood can complement Spanish Colonial, Southwestern, Hacienda, rustic, farmhouse, transitional, and contemporary kitchens. With careful measurement, suitable ventilation planning, structural preparation, coordinated backsplash materials, professional installation, and gentle copper care, this handcrafted 36-inch hood can provide lasting function while bringing the warmth and individuality of artisan metalwork into the kitchen.