 US Dollar
 Euro
Euro
 Australian Dollar
 Canadian Dollar
 Polish Zloty
 British Pound

Elevate everyday cooking with a handcrafted centerpiece that performs as beautifully as it looks. The flared copper range hood ledge balances artisan detail with serious ventilation, pairing a graceful bell profile with a refined crown ledge. This guide explains how to size, specify, install, and care for a flared copper hood so it fits your kitchen, your cooking style, and your long-term design goals.
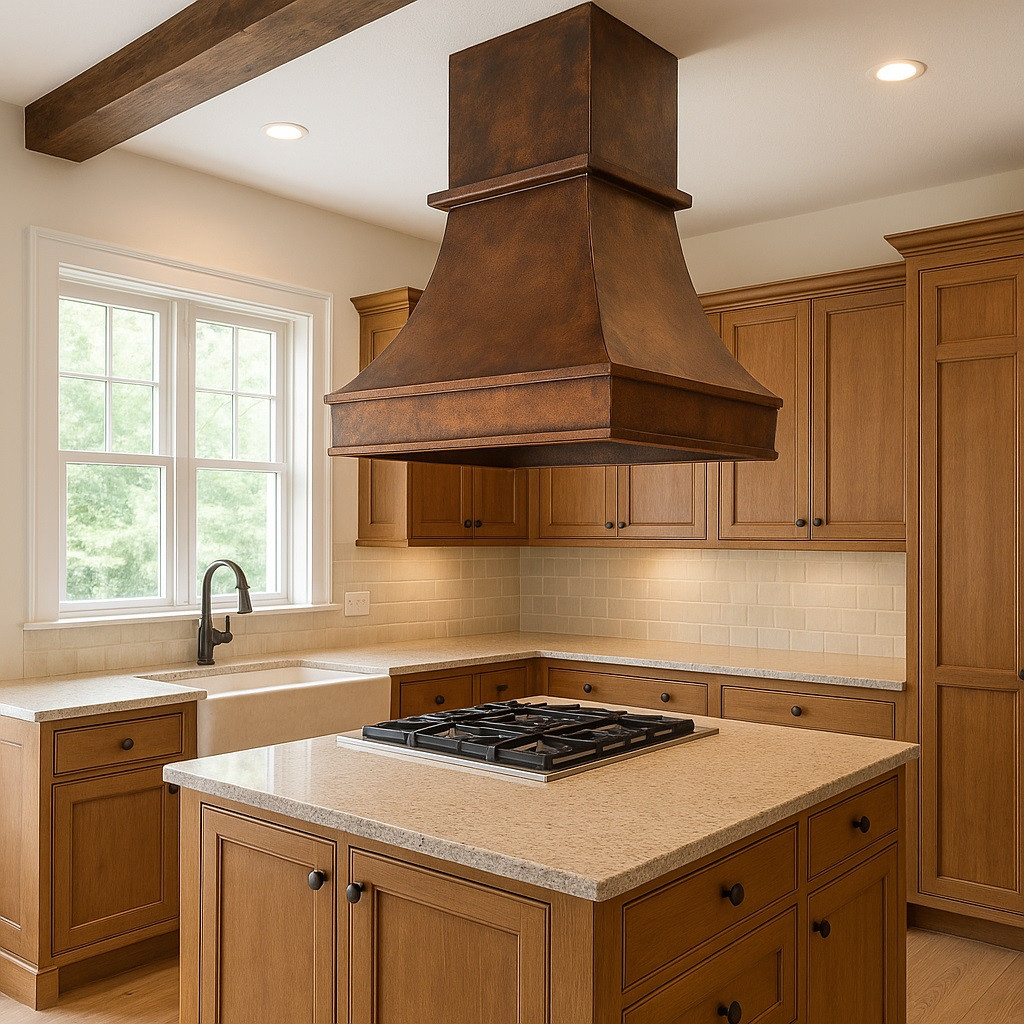
Copper Hood Design Details
A flared hood widens toward the apron, then narrows to a poised crown ledge. That geometry is not only elegant; it is functional. The apron’s breadth increases capture area directly over the cooktop. The crown condenses mass, keeping the silhouette light and architectural. In copper, subtle hammering animates the surface, scattering light and softening reflections so the hood reads warm, not flashy. The ledge itself lends proportion and a refined pause line at the transition to the chimney.
Because copper is malleable, edges can be rolled, seams tightened, and radii tuned for your space. You can specify a quiet, gentle flare for minimal kitchens or a broader, more dramatic flare for farmhouse and hacienda interiors. Rivets, straps, or a smooth body change the mood from rustic to tailored. The result is a sculptural form that feels permanent yet welcoming.
Why Copper
Copper’s thermal responsiveness helps deter condensation inside the canopy. Its natural antimicrobial properties make everyday cleaning simpler. Most importantly, copper is a “living” material. The finish evolves from bright to warm, then deepens with age, creating layers of character that painted metals cannot replicate. That evolution is a feature, not a flaw; it’s why copper range hoods remain desirable decades later. Recycled content and full recyclability also align with sustainability goals.
Sizing Essentials
Start by matching width to appliance. For standard ranges, specify a hood at least as wide as the cooktop. Many designers add 3 inches per side for stronger capture on simmer and sauté. For a 36-inch range, 42 inches of hood width is ideal; for 48 inches, plan 54. Depth matters too. An apron depth around 20–24 inches on wall installations, or 27 inches on islands, improves capture while keeping sightlines comfortable. Height depends on the insert and ceiling, but most hoods sit 30–36 inches above cooking surfaces.
Consider how a flare visually “reads” at distance. A wider flare appears lighter when mounted higher; a tighter flare feels crisper lower. If you have tall ceilings, extend the chimney or add a simple stack to maintain proportion. In compact kitchens, reduce chimney mass and let the crown ledge provide the architectural punctuation.
Ventilation Basics
Beautiful metalwork deserves equally capable airflow. Choose a UL-listed insert that matches your cooking. For gas ranges or frequent searing, 800–1200 CFM is common. For electric or induction with light sauté, 400–700 CFM often suffices. When in doubt, choose variable speed with a quiet low setting for everyday simmering and a boost for wok or steak night. Baffle filters clean efficiently and withstand dishwasher cycles; mesh filters are quieter at low speeds but require gentler care.
Ducted ventilation removes moisture, heat, and particulates outdoors; it is the performance standard. If your architecture prevents ducting, select a recirculating kit with charcoal filtration and commit to filter changes. For ducted runs, keep straight, short paths with smooth-wall duct and as few elbows as possible. A dedicated roof or wall cap matched to the CFM rating reduces turbulence and noise.
Installation Planning
Early coordination saves time. Confirm framing behind the wall or in the ceiling for safe anchoring. Pre-route dedicated power for the insert and optional hood lighting. For island installations, position the hood to center over burners, not the island’s countertop edges. Verify makeup air requirements in your jurisdiction for higher CFM systems; some codes mandate a powered makeup air damper above 400–600 CFM. Lastly, protect countertops and floors during placement to avoid accidental contact marks on the copper.
Mounting height affects sightlines, head clearance, and capture. Test with cardboard templates cut to the hood’s width and flare to validate ergonomics before final anchoring. A dry fit also lets you align crown ledge reveals with nearby cabinets or beams for a clean visual tie-in.
Finish Options
Patina sets the mood. Lighter natural copper skews contemporary and bright. Medium, honey-brown tones feel transitional. Deeper antique finishes evoke hacienda and Spanish Revival. Brushed or hand-polished highlights on edges and ledges add dimension without looking shiny. Fine, consistent hammering reads tailored; larger planishing marks feel more rustic. You can also add forged straps or rivet rows for a heritage vibe, or keep the body pristine for modern elegance.
Remember that real copper changes. If you prefer steady tone, request a protective microcrystalline wax on delivery and refresh a few times a year. If you love evolution, minimal care will let the patina deepen naturally, with high-touch areas brightening into subtle highlights over time.
Style Pairings
In farmhouse kitchens, pair the flared hood with shaker fronts, quartzite that leans creamy, and an apron-front sink. In modern spaces, contrast the warm copper with matte black fixtures, flat-panel cabinets, and light terrazzo or honed marble. For Mediterranean settings, introduce hand-painted tile in a restrained palette, rough-hewn beams, and oil-rubbed bronze pulls. The flare’s curves soften strong rectilinear cabinet lines, making the composition feel considered rather than rigid.
Lighting completes the mood. Use warm white (2700–3000K) to draw out copper’s amber tones. A pair of petite pendants or a concealed linear wash above the crown ledge will graze the metal, emphasizing relief and edge detail without glare.
Counter, Backsplash, Hardware
Material adjacency matters. If the backsplash is busy, choose a smoother hood body so finishes don’t compete. If the backsplash is quiet—say, limewash plaster or large-format stone—consider bolder hammering for depth. For hardware, unlacquered brass ages in step with copper, while blackened steel offers graphic contrast. On islands, repeat the copper tone with a modest inlay, shelf lip, or tray to create a subtle echo without appearing themed.
Only the Essentials
- Size to exceed cooktop width
- Match CFM to cooking style
- Prefer ducted ventilation
- Keep duct runs short
- Confirm makeup air early
- Plan mounting height
- Protect copper during install
Care and Cleaning
Daily care is simple. Wipe splatter promptly with a soft cloth and warm, mildly soapy water. Avoid ammonia, bleach, and abrasive pads; they can strip protective wax or abrade the patina. Dry after cleaning to prevent water spots. If you enjoy a glossy look, apply a thin copper-safe wax two to four times a year. For a more natural, evolving finish, reduce intervention and let daily use write the surface story. Baffle filters appreciate monthly dishwasher cycles; rotate sets so you can clean without downtime.
Expect small marks and micro-scratches to blend as the finish matures. This ability to self-harmonize is a copper advantage—what reads as “wear” on coated metals reads as “life” on a living finish.
Acoustics and Airflow
Noise is a common complaint with commodity hoods. You can tame it. Choose an insert with a remote in-line or external blower; moving the motor to the attic or outside lowers sound at the cooktop. Upsize duct diameter within the insert’s specification to reduce air velocity. Use smooth aluminum or stainless duct, not flex. Softly radius turns instead of hard elbows when possible. These details collectively yield a strong, calmer system you will actually use.
Islands vs. Walls
Island installations demand greater capture because cross-drafts are common. Favor a slightly wider hood and deeper apron to compensate. On walls, adjacent cabinets and the backsplash corral rising plumes, so you can run slightly lower CFM in comparable cooking scenarios. For peninsula layouts, mind sightlines into living areas; choose a flare proportion that reads elegant from multiple angles, and consider a slimmer chimney to reduce visual bulk.
Budget and Value
A custom copper hood is a long-horizon investment. While the upfront cost exceeds off-the-shelf steel, the lifecycle value is different. Copper’s durability, repairability, and patina development help it improve with age. It can be refinished, re-waxed, or re-patinated decades later. In resale, a well-executed hood reads as “architecture,” not “appliance,” lifting perceived quality for the entire kitchen. Factor in the ventilation insert, ductwork, electrical, and installation when budgeting the full system.
Customization Notes
Tailor the crown ledge profile to your cabinetry reveals. Align ledge thickness with upper door rails for a designer’s “through-line.” Request hidden access panels for insert service that disappear within seam lines. Ask your fabricator to pre-block for pot-rail brackets if you plan to hang utensils within the capture zone. For coastal homes, specify stainless fasteners and a patina tuned to salt-air exposure, then add a more frequent wax cadence.
Common Mistakes
Don’t undersize the hood simply to match cabinet width; performance will suffer. Don’t over-mount (too high) in the name of openness; capture degrades faster than aesthetics improve. Avoid high-gloss lacquers; they can look plastic and complicate future refinishing. Resist overly busy combinations—busy tile, heavy straps, deep hammering—without a neutral counterpoint. Edit for clarity and hierarchy; let the flare and ledge carry the composition.
Project Checklist
Finalize appliance specs, then confirm hood width and height. Approve shop drawings that show flare angle, ledge thickness, seam layout, and strap or rivet placement. Coordinate insert model, CFM, filter type, lighting, and control location. Lock duct path, cap type, electrical circuit, and makeup air. Schedule finish samples in your room’s lighting. Plan protection during install and set the first wax date on your calendar.
Closing Thoughts
A flared copper range hood with crown ledge is more than a place for air to move—it’s the kitchen’s architectural heartbeat. The flare shapes performance, the ledge orders proportion, and the copper records time with dignity. Specify thoughtfully, install carefully, and care simply. Do that, and the copper hood you choose today will feel even more at home ten years from now, when the patina is deeper, the edges glow brighter, and family meals have written themselves into the metal.