 US Dollar
 Euro
Euro
 Australian Dollar
 Canadian Dollar
 Polish Zloty
 British Pound

Your sink size controls comfort, clearance, and daily cleanup. It also shapes the whole vanity look. This guide keeps sizing simple. It uses real measurements. It avoids vague rules. Start by viewing our Mexican bathroom oval sinks. Then use the steps below. You will choose with confidence. You will reduce install risk. You will also prevent awkward proportions. Let’s find your best fit.
Why sink size matters more than most people expect
Sink size impacts how your bathroom feels. It affects elbow room and reach. It also affects splashing and counter mess. A sink can look perfect online. It can feel wrong in place. Size is the usual cause. Oval sinks need balanced proportions. They read softer than rectangles. They still need strong scale control. Too large feels crowded. Too small feels cheap. The right size looks intentional.
Start with the vanity width, not the sink
Your vanity width sets your sink range. It defines edge clearance. It also sets visual balance. Measure the top width first. Use a tape measure. Do not guess. When you start with vanity width, you protect counter space. You also protect symmetry. A sink that fills the full top looks cramped. It also leaves no room for soap and daily items.
Use these width guidelines as a baseline
For a 24 inch vanity, keep the sink compact and centered. Leave room for hands and soap. For a 30 inch vanity, you have more flexibility. Wider ovals can still look balanced. For a 36 inch vanity, you can go bolder. You can also choose deeper bowls. Do not push to the edges. You need landing space and seal space to prevent water damage.
Plan for side clearance on both sides
Side clearance keeps the top usable. It also protects the counter edges. Aim for even spacing because it reads intentional. Uneven spacing looks accidental. Small vanities need strict spacing. Large vanities can hide errors. Still, symmetry usually wins. It feels calmer every day and makes the whole vanity look designed.
Measure vanity depth and wall position
Depth matters as much as width. Many bathrooms have tight walk space. A deep sink can project forward and reduce comfort. It can also block drawers. Measure the vanity depth next. Then measure wall setbacks. Note backsplash thickness and any trim. These details decide how far forward the bowl can sit without feeling crowded.
Choose a sink that preserves front counter space
Front counter space prevents drips. It also gives you a place for hands. Too little space feels cramped. It can also increase splashing. Keep a small front margin when possible. If your vanity is shallow, size down. Choose a smaller oval profile and avoid oversized rims that eat counter depth fast.
Watch for door swing and traffic paths
Bathrooms have moving parts. Doors often swing inward. A bulky vanity zone can collide with that swing. People also pass behind users in shared spaces. Stand where the sink will sit. Mimic a morning routine. Imagine someone passing behind you. If it feels tight now, it will feel tighter later, so size down.
Know the three sink dimensions that matter most
Most listings show several numbers. Only three drive comfort. Those are outside width, outside depth, and bowl depth. These three decide daily feel. They also decide whether the sink looks balanced on the top. When you understand these measurements, you stop guessing and you start choosing with control.
Outside width controls scale and counter space
Outside width is the sink’s widest point. It drives visual presence. It also sets side clearance. Wider is not always better because wider can crowd fixtures and daily items. Pick a width that leaves usable counter zones. That includes soap space and toothbrush space. It also includes a small splash buffer space near the bowl.
Outside depth controls reach and clearance
Outside depth is front to back size. It affects how far you lean. It also affects faucet placement. Too deep can strain your back. Too shallow can splash more. Balance depth with faucet reach. The spout must land water near the bowl center. That prevents drips on the rim and reduces mineral rings.
Bowl depth controls splash and washing comfort
Deeper bowls reduce splash in many cases. They also hold more water volume. They can feel luxurious. They can also raise faucet needs. Shallow bowls look sleek and modern. They can splash with high flow. They need careful faucet choice and a gentler water stream. Choose depth based on how you wash hands and face.
Rim width changes the real usable bowl area
Oval sinks often have decorative rims. Those rims look beautiful. They also reduce bowl opening size. Two sinks can share outside dimensions and still feel different in use. Rim width changes hand room. It also changes how easy it is to wipe water off the top. Compare bowl opening and rim width together before you decide.
Wide rims feel substantial and crafted
Wide rims read like a frame. They highlight painted borders. They also feel sturdy. They reduce the open water area, which can increase splash risk if the faucet hits the rim. Wide rims also reduce hand room. That matters for frequent washing. It matters more in small baths where every inch counts.
Narrow rims maximize the bowl opening
Narrow rims give more wash space. They also look lighter. They can feel more modern. They usually clean faster because there is less flat surface. Pick rim width based on routine and cleaning preference. Beauty and practicality can still match when the rim supports how you use the sink daily.
Match sink size to faucet reach and height
Faucet pairing is a sizing step. It should not be last. The faucet must land water correctly. Wrong pairing causes mess. It also causes mineral rings. Your sink can be perfect in size, yet feel wrong if the spout hits the rim. Plan the faucet and sink together so daily use stays clean and comfortable.
Spout reach should land near the bowl center
Water should fall near center. It should not hit the rim. It should not hit the back wall. Center landing reduces splash. It also reduces drips on glaze. If reach is short, size down or choose a different faucet. If reach is long, avoid tiny bowls because long reach can overshoot the drain zone.
Spout height should clear the rim comfortably
Too low feels cramped. Too high can splash more. Height should match bowl depth. It should also match rim height. Taller rims need more clearance. Consider hand clearance while washing. Consider bottle filling too. If you fill bottles often, keep extra height so the sink stays practical.
Consider who uses the bathroom every day
Sink size should fit the main users. A guest bath has different needs than a primary bath. A kids bath needs easy reach and better splash control. Primary baths need comfort and durability. Think about daily habits. Think about how fast people move. Then choose a size that supports those routines.
Primary bathrooms benefit from more bowl volume
Primary baths see heavy daily use. Larger bowls reduce overflow risk. They also reduce splash during fast routines. They can handle face washing better. Do not sacrifice counter space entirely because storage matters too. Aim for balance, not maximum size, so the vanity stays useful and comfortable.
Powder rooms can prioritize style over capacity
Powder rooms see light use. A smaller sink can still work. It can also look refined. You can choose bolder patterns or sculptural rims. Still, leave room for soap and a hand towel. Those details keep the room functional and prevent the sink from feeling like a tight fit.
Kids bathrooms need reach and splash control
Kids often use extra water force. Splash control becomes important. Bowl depth can help here. Rim width can trap water too. Choose a size that feels approachable. Avoid overly tall setups. Keep faucet controls easy to reach so the sink stays easy and less messy in daily use.
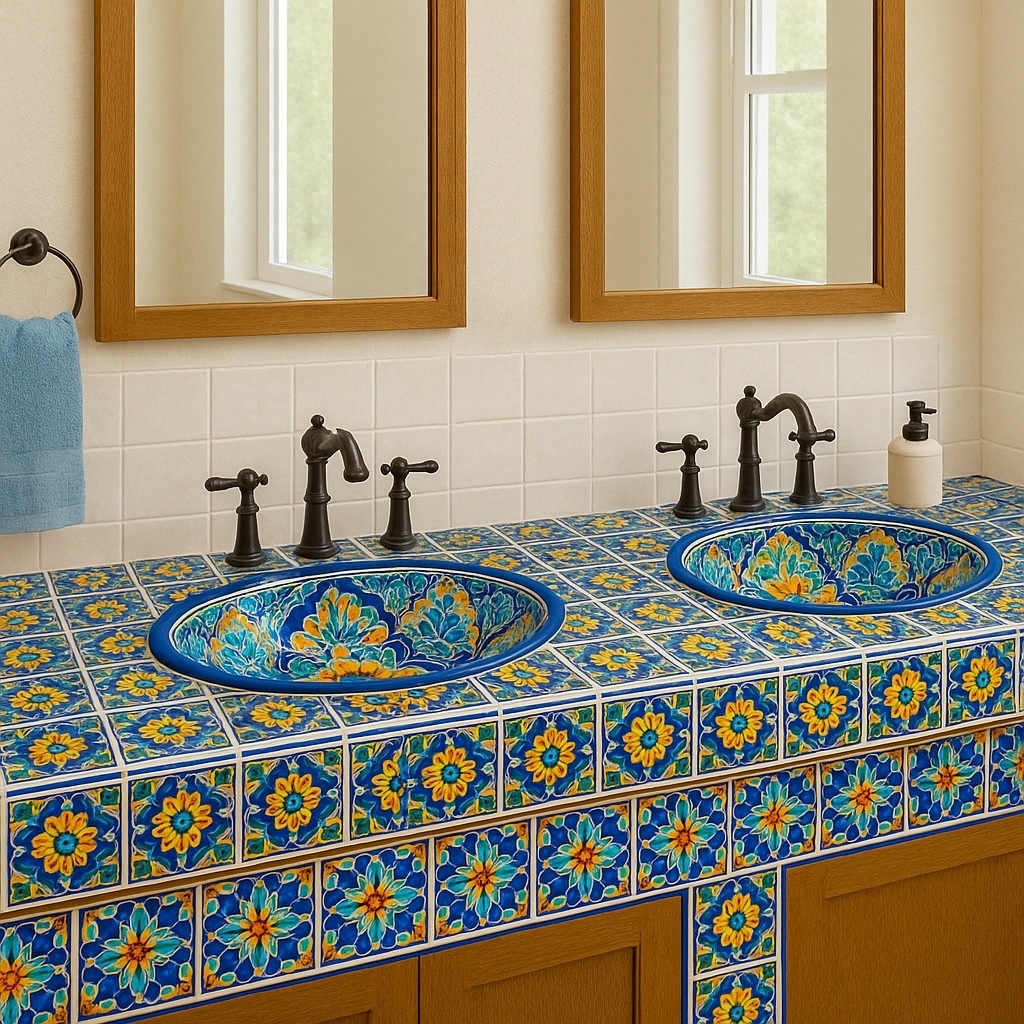
Single vanity versus double vanity sizing
Double vanities create new constraints. Each sink needs landing space. Each sink needs mirror alignment. Each sink needs drawer clearance too. A double vanity can look expensive and still feel awkward if the sinks crowd the center. Plan spacing early so the setup feels balanced and comfortable for two users.
Give each sink its own personal zone
Two users need separation. Tight spacing creates daily friction. Leave room between sinks. Leave room for shared storage. Keep symmetry when possible because it reads calm. Oval sinks look great in pairs. They soften large vanities and break up straight lines. Matching sizes usually looks best.
Do not crowd the center storage area
Many double vanities have center drawers. Oversized sinks can block them. They can also force odd faucet placement. Check drawer paths before you choose. Open drawers during measuring. Note where plumbing sits. Note where sink bowls will drop. This prevents surprises during installation.
Cabinet interior clearance is a hidden sizing limit
Sink bowls take interior space. Deeper bowls need more clearance. Some cabinets have drawers below. Some have shelves. Some have braces. A sink can fit on top and still fail inside. Always confirm the cabinet interior before you finalize size so you do not lose storage or hit structural parts.
Measure interior height and depth
Open the cabinet doors. Measure height to the top. Measure depth to the back wall. Note any drawer boxes above. Note any rails inside. A large bowl can hit a drawer box. It can also block a shelf. If interior space is tight, choose a shallower bowl to preserve function.
Plan around plumbing placement
Drain location matters. Supply lines matter too. Some vanities place them off center. Some walls place them low. Plan for those constraints. If plumbing is fixed, adapt sink choice. If plumbing can move, confirm cost because that cost can exceed the sink upgrade you were planning.
How to measure correctly, step by step
Measurement errors cause most returns. Use a simple process. Write down each number. Take photos of your tape measure. Keep those photos for reference. When you measure carefully, the sink choice becomes easy and confident. You also prevent install delays caused by cutout changes or unexpected clearances.
Step one: measure the vanity top surface
Measure width from edge to edge. Measure depth from front to back. Measure backsplash height if present. Measure any raised lip too. Write each number clearly. Do not round too much. Small differences can matter, especially near walls and corners where clearance problems show up first.
Step two: mark a safe sink footprint
Use painter’s tape on the top. Mark a proposed sink rectangle. Keep it centered. Leave side clearance. Leave front margin too. Stand at the vanity and test reach. Mimic handwashing. Mimic face washing. If it feels tight, adjust tape inward until it feels natural and open.
Step three: confirm faucet position space
Mark where the faucet will sit. Confirm it does not hit the wall. Confirm handles clear the backsplash. Confirm your hands fit comfortably. This step prevents awkward reach. It also prevents splashy angles. It makes the setup feel natural before any cutting begins.
Sink Size Checklist
This checklist helps you keep decisions in order. Measure vanity width and depth first. Leave side clearance for daily items. Keep a small front counter margin. Confirm cabinet interior bowl clearance. Match spout reach to bowl center. Match spout height to rim height. Check drawer paths and door swings. Size for main users and routines.
Visual proportion tips for oval sinks
Oval sinks create softer geometry. They also create focal points. Proportion keeps them from feeling random. It keeps them from feeling oversized too. A sink can fit physically and still look wrong visually. Use the mirror and vanity as your proportion references so the oval shape feels balanced and intentional.
Match oval width to mirror width
A small sink under a huge mirror looks lost. A huge sink under a narrow mirror looks heavy. Try to balance those widths. Aim for calm alignment. If you cannot change the mirror, size the sink accordingly. Visual harmony improves the whole room and makes the setup feel more upscale.
Repeat one sink color elsewhere
Color affects perceived size. Dark colors feel heavier. Bright colors feel more active. Repeating one color anchors the sink and reduces visual clutter. Use towels, art, or small decor. Keep it minimal. Let the sink remain the star so the vanity looks composed and not over decorated.
Common sink sizing mistakes to avoid
Most mistakes follow a pattern. They come from guessing. They come from chasing the biggest option. They also come from ignoring faucet geometry. A sink that feels cramped or splashy is usually a planning issue. Avoid these mistakes and you will get a sink that feels comfortable and looks correct.
Mistake one: choosing by outside size only
Outside size can mislead. Rim width changes the opening. Bowl depth changes comfort. Always compare opening size too. Always compare depth too. Two sinks can share outside measurements and still feel different in daily use, so read the full dimensions instead of one headline number.
Mistake two: ignoring reach and splash behavior
A wrong faucet creates daily mess. Water hits the rim. Water runs down the outside. Mineral rings form quickly. This is avoidable with planning. Match spout reach to the bowl center and match height to rim clearance so water lands where it should and cleanup stays easy.
Mistake three: forgetting storage and counter function
A sink can steal your usable top. That hurts daily routines. Leave space for soap and toothbrush items. Leave space for a tray too. Function should support beauty. Beauty alone will not feel good. Comfort matters every morning, and the right size protects both use and style.
How to choose when you are between two sizes
This happens often. Two sizes may both fit. Choose based on use, not appearance. Think about daily washing habits. Think about splash tolerance too. In most cases, the better choice is the one that protects counter space and feels open at the vanity, because that improves daily comfort.
Choose the smaller size when space is tight
Small bathrooms need breathing room. A smaller sink protects walkway space. It also protects counter space. It keeps the room feeling open. Small sinks can still look premium. Pick a strong pattern and a refined rim. The effect stays high impact without crowding the vanity.
Choose the larger size when comfort is the priority
Primary baths benefit from comfort. Larger bowls reduce splashing. They also support face washing better. They also feel more luxurious. Still, confirm cabinet clearance first. Confirm faucet pairing too. Then choose the larger option confidently, knowing it will look right and work well daily.
Conclusion
Choosing the correct sink size is measurable. Start with vanity width and depth. Then confirm cabinet interior clearance. Next, match faucet reach and height. Finally, test the footprint with tape. When you follow these steps, sizing becomes easy. Your oval sink will look balanced. Your counter will stay useful. Your daily routine will feel better. Your bathroom will feel designed on purpose.