 US Dollar
 Euro
Euro
 Australian Dollar
 Canadian Dollar
 Polish Zloty
 British Pound

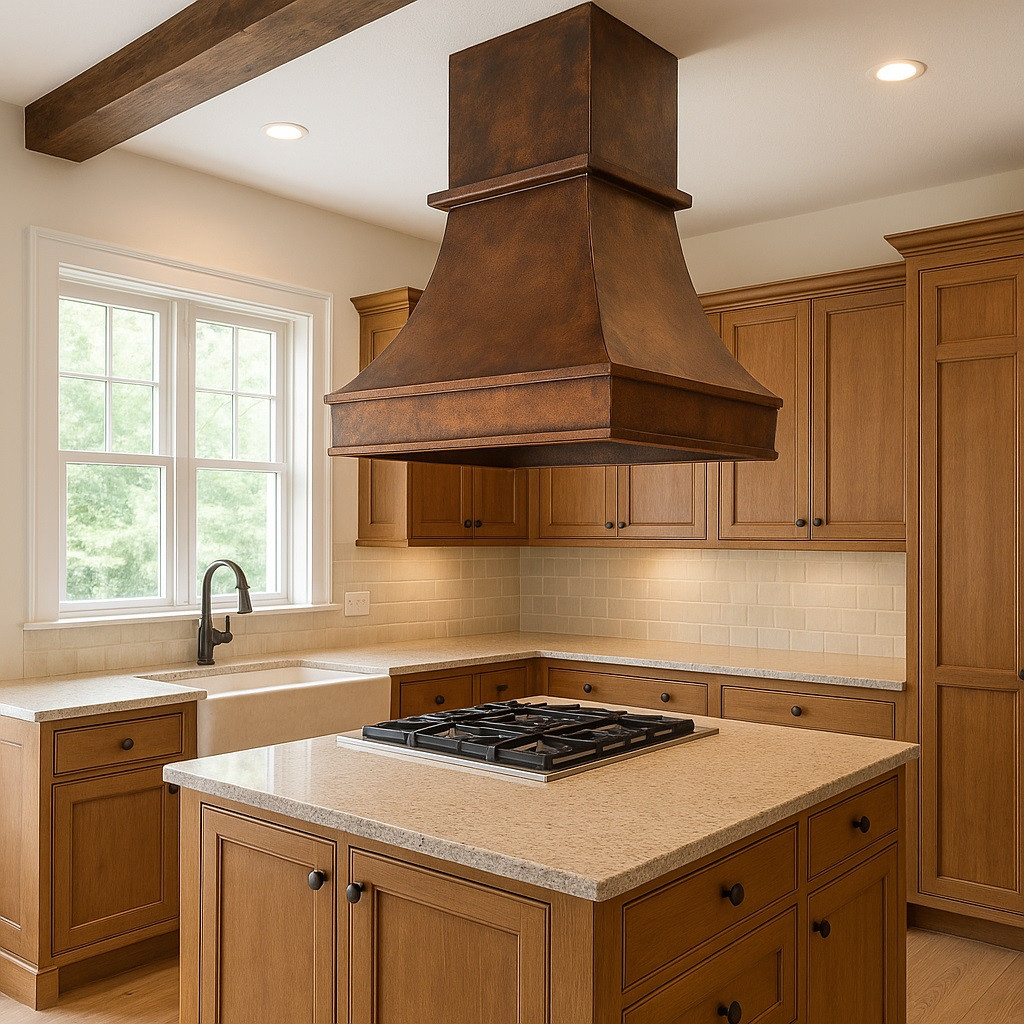
A kitchen island range hood must vent well and look great. It sits in the center of the room. It is visible from every angle. This buying guide explains sizing, ventilation, materials, and care. It also covers ducted and ductless options. Start by browsing our handcrafted metal hoods to compare shapes and finishes.
Why an island hood matters
An island cooktop needs direct capture above the heat. Smoke rises fast in open layouts. Grease can spread across nearby surfaces. A strong island hood protects air quality. It also reduces lingering food odors. It can become the kitchen’s main centerpiece.
Rustica House island hood configuration options
All Rustica House metal range hoods are available in a kitchen island configuration. When you are ready to order, select the island hood version in the product page option menu. This ensures the hood is built for 360 degree visibility and proper ceiling mount installation.
What a kitchen island range hood is
A kitchen island range hood mounts to the ceiling. It sits above a cooktop on a central island. It must look finished on all sides. Wall hoods can hide backs and edges. Island hoods cannot. The build needs clean seams and proportion.
Key performance differences from wall hoods
Island hoods often need more airflow. They have open space on all sides. Cross drafts can pull smoke away. That makes capture harder. A wider canopy helps. Proper mounting height helps too. Duct design also matters a lot.
Choosing the right metal for your island hood
Metal changes the mood of your kitchen. It also changes texture and reflection. Some finishes feel rustic and warm. Others feel tailored and calm. Pick the metal that fits your cabinets and lighting.
Copper for warmth and artisan depth
Copper brings instant character to an island hood. Hammered surfaces add rich movement. Patina adds soft variation over time. Copper pairs well with stone and wood. It also suits Spanish and Mediterranean spaces.
Zinc for soft tone and quiet aging
Zinc reads calm and architectural in open kitchens. It develops a muted patina. It avoids bright glare under pendants. Zinc works well with modern farmhouse design. It also fits French country kitchens.
Brass for bold contrast and glow
Brass adds a warm golden highlight. It looks striking above an island. It pairs well with dark cabinetry. It also works with marble and quartz. Hammered brass feels rustic and handmade. Smooth brass feels cleaner and refined.
Iron for dramatic rustic presence
Iron creates strong contrast in open layouts. It fits industrial and farmhouse kitchens. It also supports Old World interiors. Dark finishes hide visual clutter. Rivets and straps add craft detail.
Tin and pewter for decorative character
Tin can feel vintage and ornate. Pewter can feel muted and historic. Both can soften bright kitchens. They also look great with patterned tile. Choose them when you want decoration with warmth.
Hammered versus smooth surfaces
Texture changes how a kitchen island range hood reads. Hammered metal breaks up reflections. It hides fingerprints and smudges. It also looks more rustic. Smooth metal feels tailored and calm. It works well with quiet stone.
When hammered makes the most sense
Choose hammered metal for busy family kitchens. It also suits rustic interiors well. It looks great with wood beams. It can balance bold tile. It also feels more artisan made.
When smooth is the better choice
Choose smooth metal for modern and minimal kitchens. It keeps lines crisp and clean. It also works with patterned backsplashes. Smooth surfaces highlight the silhouette. They can look more architectural.
Learn more about texture choices
If you want deeper detail, read our guide on hammered versus smooth hoods. It helps you match texture to style. It also explains how reflection changes the look.
Size planning for kitchen island range hoods
Start with cooktop width. Then plan capture area. Island hoods benefit from extra width. Wider canopies catch smoke more reliably. This matters in open layouts. It also matters with gas burners.
Width guidelines that reduce smoke escape
Many buyers choose a hood wider than the cooktop. Extra overhang improves capture. It also looks more substantial above an island. Keep the hood centered to the cooktop. Confirm your ceiling framing can support it.
Kitchen height and hood drop planning
Ceiling height changes island hood proportion. Tall ceilings need a longer chimney. Short ceilings need a compact drop. The goal is visual balance. The hood should not feel tiny. It also should not feel crowded.
Distance between cooktop and hood
Mounting height affects safety and performance. Too high reduces capture. Too low can feel cramped. Follow your blower or insert requirements. Also follow local code rules. Gas and electric may differ.
Ducted versus ductless island hoods
Ducted island hoods vent air outdoors. They usually perform best. Ductless island hoods recirculate filtered air. They can be easier to install. They may need more frequent filter changes. Choose based on duct access.
Duct design tips that improve airflow
Shorter duct runs work better. Fewer elbows help too. Smooth duct transitions reduce turbulence. A good roof or wall cap matters. Poor duct design can waste airflow. Plan the route before ordering.
Lighting and daily comfort
Island cooking needs strong task lighting. Many inserts include lights. Good lighting improves safety. It also improves presentation. Warm light can enhance metal finishes. Avoid harsh glare when possible.
Care and maintenance for island range hoods
Clean often to prevent grease film. Use mild soap and water. Dry with a soft cloth. Avoid abrasive pads and harsh chemicals. Clean filters on schedule. Replace filters when needed.
How to keep the finish looking consistent
Patina will change in real kitchens. That is normal for many metals. Wipe splatter quickly when possible. Use gentle habits near heat and steam. If you want a uniform look, keep cleaning consistent.
Installation planning for island range hoods
Island hoods need strong ceiling support. Weight matters with copper and iron. Use proper blocking and bracing. Plan electrical and duct location early. Confirm the hood aligns with the island centerline. Small shifts look obvious.
Use a pro for safer results
Professional install reduces risk. It helps with duct sealing. It also helps with correct mounting height. It ensures the hood is level. It also protects your ceiling finish.
Kitchen Island Range Hood Buying Checklist
- Confirm cooktop width and centerline
- Choose wider canopy for better capture
- Plan mounting height per insert specs
- Map duct route with fewer elbows
- Pick metal finish for your kitchen
- Decide hammered or smooth texture
- Confirm ceiling support and blocking
- Plan filter cleaning and lighting needs
Explore island hood styles and collections
If you want a custom focal point, start with your preferred metal. Copper adds warmth and patina. Zinc adds calm and softness. Brass adds glow and contrast. Iron adds bold rustic presence. Tin and pewter add decorative character.
Shop by metal category
Browse copper range hoods for warmth and texture. Explore zinc range hoods for a matte look. Consider iron range hoods for dramatic contrast. View brass range hoods for golden depth. See tin range hoods for vintage detail. Shop pewter range hoods for muted elegance.
Conclusion
A kitchen island range hood must balance capture and design. Start with size and mounting height. Then plan ducting and ceiling support. Choose a metal finish that fits your kitchen. Decide on hammered or smooth texture. With good planning, your island hood becomes a strong centerpiece.
More island hood guidance
For more detail, visit our kitchen island range hoods guide. It adds planning tips for real layouts. It also helps you avoid common mistakes.