 US Dollar
 Euro
Euro
 Australian Dollar
 Canadian Dollar
 Polish Zloty
 British Pound

A copper hood changes how a kitchen feels. It adds warmth and depth. It also improves daily ventilation. This guide keeps buying simple. It focuses on fit and function. It avoids vague style advice. Start with the product page for copper range hood decorative apron. Then follow each step below. You will plan with confidence. You will reduce install surprises. You will also get a hood that looks intentional.
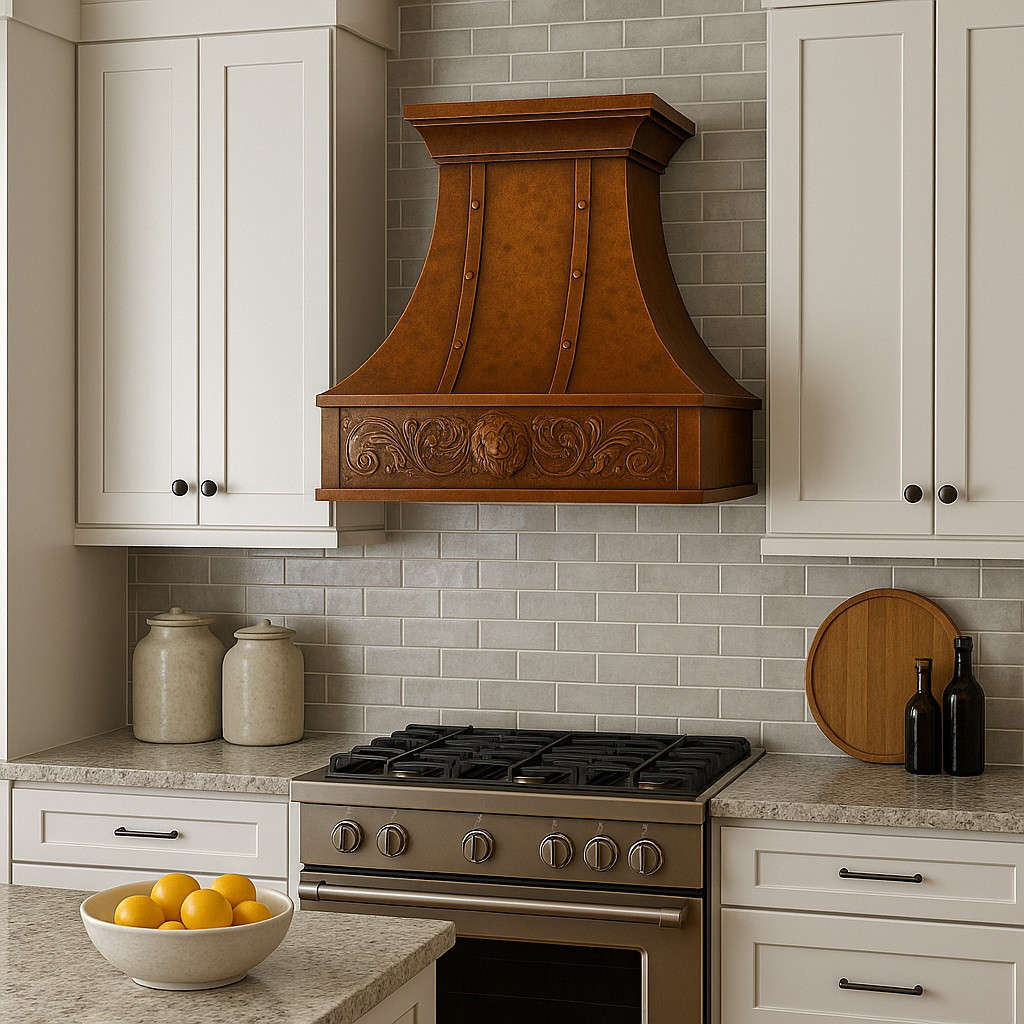
What makes a decorative apron copper hood special
A decorative apron gives the hood a crafted base detail. It adds personality near eye level. It also frames the cooktop zone. This style often becomes the kitchen focal point. That means proportions matter more. The apron should match cabinet scale. It should also suit backsplash patterns and grout lines. When the apron detail fits the room, the hood looks custom.
Start by choosing the right hood family
Many buyers begin with copper only. A better step is to compare categories first. Review the broader collection of metal range hoods to confirm the look you want. Metal choices change the mood fast. Copper feels warm and classic. Other metals feel cooler or more industrial. Once the family is chosen, sizing and venting become easier.
Use copper when you want warmth and soft reflections
Copper reads rich under kitchen lighting. It also gains character as the patina ages. That natural depth helps busy kitchens feel calmer. Copper pairs well with wood, stone, and plaster. It also complements rustic and transitional cabinetry. If you want a hood that looks alive, copper is a strong choice.
Use the copper category to compare silhouettes quickly
Browsing the full set of copper range hoods helps you spot the right shape. Shape controls the visual weight. It also controls how tall the hood feels. Some silhouettes taper softly. Others look more architectural. Compare several side by side before you decide.
Pick installation type first: wall or island
Installation type changes everything downstream. It affects duct routing and electrical planning. It also affects visibility from the room. A wall hood can use a chimney rise. An island hood needs finished sides. It also needs thoughtful lighting alignment. Decide this early so you do not redesign later.
Wall mount works best with a strong backsplash center
A wall hood aligns naturally with a cooking wall. It also benefits from a clear center axis. This makes the apron detail feel framed. It also helps cabinetry symmetry. If your kitchen already has a centered range wall, wall mount is usually simplest.
Island mount needs balanced side views
An island hood is seen from many angles. That makes strap placement and apron scale more noticeable. It also makes finish consistency important. Plan your island lighting and hood height together. This avoids a crowded ceiling zone.
Choose width using the cooktop rule that always works
Most kitchens look best when the hood is wider than the range. Wider capture feels cleaner. It also looks more intentional. Many buyers choose the same width as the cooktop. That can work, but it is less forgiving. When in doubt, go slightly wider if space allows.
Match width to cabinets and crown lines
Cabinet runs create strong horizontal lines. Your hood should respect them. A hood that is too wide can break the rhythm. A hood that is too narrow can look undersized. Use cabinet edges as your visual guide. Then confirm clearances with real measurements.
Plan hood height as a proportion decision
Height is not only about coverage. It is also about how tall the kitchen feels. A taller hood can look grand. It can also feel heavy in low ceilings. Measure from cooktop to ceiling. Then decide how much wall space you want above the hood. This keeps the room balanced.
Use a taller chimney when ceilings are high
High ceilings need vertical structure. A taller chimney fills the wall nicely. It also makes the hood feel built in. This is ideal when you want an architectural centerpiece. It also works well with tall cabinet stacks.
Keep height controlled in compact kitchens
Smaller kitchens need breathing room. A very tall hood can dominate. Choose a height that leaves space for tile and trim. This keeps the wall light and open. The apron still provides detail without heaviness.
Decide on texture: smooth or hammered
Texture controls how light behaves. Hammering breaks reflections and adds depth. Smooth surfaces feel cleaner and more modern. Both can work with an apron design. The key is matching texture to your kitchen finishes. Busy tile often pairs better with calmer texture. Simple walls can handle heavier hammering.
Hammered copper hides smudges and softens glare
Hammered texture diffuses light. It makes the surface forgiving. It also adds artisan character at close range. This works well in rustic and Mediterranean kitchens. It also pairs well with natural stone. If you want movement, choose hammered.
Smooth copper looks crisp and tailored
Smooth copper reads more refined. It also shows patina shifts more clearly. This can suit transitional kitchens. It can also suit modern spaces that want warmth. If your kitchen has clean lines, smooth copper keeps the look disciplined.
Choose a patina that matches your fixed finishes
Patina is your color story. It should relate to counters, floors, and hardware. Light patinas feel airy and bright. Dark patinas feel grounded and dramatic. Mid tones feel flexible and classic. Choose based on undertones, not trends. Warm wood usually loves warm patinas. Cool stone often pairs with deeper tones.
Use lighter patinas to brighten small kitchens
Lighter finishes keep the room open. They also highlight the copper glow. This is helpful in smaller spaces. It also works well with white cabinets. If you want the hood to lift the wall, go lighter.
Use darker patinas to anchor large kitchens
Darker finishes add weight and contrast. They can make tall kitchens feel grounded. They also pair well with iron hardware. If your kitchen has a lot of white, a darker hood adds drama. It can also help the apron detail stand out.
Make venting decisions before you order
Venting determines performance and planning. Ducted setups move air outside. Ductless setups filter and recirculate. Your kitchen layout often decides what is possible. Confirm duct route early. Confirm blower location too. This prevents last minute compromises. It also protects ceiling and cabinet work.
Ducted venting is best for heavy cooking
Ducted systems remove heat and grease more effectively. They also reduce lingering odors. If you cook often, ducted is usually worth it. Plan the duct path to be direct. Shorter runs perform better. Gentle turns also help airflow.
Ductless venting works when duct routes are limited
Ductless setups can be practical in remodels. They avoid major construction. They still need good filtration and maintenance. Make sure your insert supports recirculation. Then plan for filter changes. This keeps performance stable.
Plan the insert and blower strategy
Your hood is the shell. The insert is the engine. Some buyers already have a blower. Others need a complete insert solution. Decide which route you prefer. Confirm electrical needs and control style. Then ensure the hood is built to fit the insert footprint. This avoids gaps and noise issues.
Use a fit focused approach if you already own an insert
If you have a blower you trust, build around it. Provide its dimensions and mounting needs. Confirm duct size and discharge direction. This ensures clean alignment. It also prevents awkward modifications. A custom hood should feel seamless.
Plan long term maintenance as part of buying
Grease management matters over time. Filters and lights will need attention. Switches may wear. When you plan maintenance now, the hood stays enjoyable later. Keep a maintenance path simple. Know where to find replacement components. The range hood spare parts section helps when you need a fast fix.
Think about apron scale with backsplash patterns
Apron detailing sits close to tile. That makes it visually connected to backsplash choices. If your tile is busy, choose a cleaner apron border. If your tile is calm, richer apron detail can shine. Also consider grout grid alignment. Strong grids can fight ornate details. Soft tiles can support them well.
Use contrast to keep the apron readable
The apron should be visible from standing distance. If it blends into the wall, it loses impact. Contrast can come from patina depth. It can also come from strap color and rivets. Choose contrast that matches hardware. This makes the whole wall look coordinated.
Set expectations for made to order production
Custom hoods are not instant ship items. They are built to your selections. That includes size and finish choices. Plan your timeline around production. Also plan your installation window. Coordinate with cabinet and tile work. When the hood arrives at the right phase, the project runs smoother.
Buyer checklist for a decorative apron copper hood
Use this list to keep decisions in order and avoid costly rework.
- Confirm wall mount or island installation type
- Choose width based on range and cabinet rhythm
- Pick height that fits ceiling and wall proportion
- Select smooth or hammered texture for your style
- Choose patina based on counters, floors, hardware
- Decide ducted or ductless venting plan early
- Confirm insert fit, duct size, and discharge path
- Plan future upkeep with accessible spare parts
How to avoid the most common buying mistakes
Most mistakes come from skipping measurement steps. Another issue is choosing color before layout. A third issue is ignoring insert requirements. Avoid these by measuring first and planning venting early. Then choose your finish and detailing. When your priorities are in order, the hood looks right and performs well.
Mistake one is choosing width by looks alone
A hood can look great in photos and still fail in your kitchen. If it crowds cabinets, it feels wrong. If it is too narrow, it looks undersized. Measure your range and cabinet span. Then choose a width that supports the wall composition. This keeps the kitchen balanced.
Mistake two is ignoring depth and capture zone
Depth affects how well the hood captures rising air. It also affects how far it projects. A projection that is too deep can feel intrusive. A projection that is too shallow can reduce performance. Confirm your standard depth needs. Then adjust if your cooktop and layout require it.
Mistake three is ordering before venting is planned
Venting drives insert and duct choices. Those choices drive cutouts and clearances. If you order first, you may compromise later. Always confirm duct route and electrical location. Confirm whether you need recirculation. Then finalize the hood build details.
Conclusion
A decorative apron copper range hood is both functional and visual. It should fit your kitchen layout first. It should match fixed finishes next. Choose installation type early. Then choose width, height, and texture with measurements. Select a patina that supports your palette. Confirm venting and insert strategy before you buy. When these steps are clear, your hood becomes a true centerpiece that performs well and looks custom.